The Restaurant Check screen is the screen used (with Skyware's Point of Sale module) for entering menu order information, number of customers at a table, and other information to an open restaurant check. The screen appears once you create a new check for any table or point of service within the POS, or after you select to view an open check. (See also How to Open a Check, Create or Open a Check and Modify an Open Check). It may be reached via the Restaurant Log In page or through the regular Skyware system at any time, using the POS Main Menu.
The Restaurant Check screen opens with the Items tab automatically shown.
Note: The options shown on your Restaurant Check screen are Property specific, and are determined via the configuration options set using the POS Configuration Menu. This menu contains commands that allow you to configure and edit the items configured for the food and beverage service areas of the property. Much of this will have been performed during the initial installation of Skyware Systems, but can also be done subsequently.
Via the Restaurant Log In page:
The Restaurant Log In page is a separate, stand alone web page screen in Skyware for your Property that may be reached directly via your browser. It is recommended that it be bookmarked for easy use.
When accessed, the Restaurant Log In page will open, automatically displaying the "Table" field of service option, and keypad for entering the Server Quick ID.

Note: This start page has several areas that only become live AFTER log in. If changes are attempted without user ID being entered the screen will revert back to the original with the red banner A Quick ID is required!
Type the User number into the Server Quick ID log in field to make the rest of the screen live.
Click on any of the available table options (or the Quick Sale button) to open a check. This opens the Restaurant Check screen (the Quick Sale screen and the Restaurant Check page are the same, except that the "Change Table" button displays -NONE- on the Quick Sale screen).
To reach this screen select Point of Sale (POS) => from the Other section of the Full Menu, which will open the POS Main Menu, then click on the command Create/Open Check at the top of the Checks section.
Click the icon on the left, or the breadcrumb words "Full Menu" on the top right of the screen to open the Full menu.
 OR
OR
This will display the Full menu in a tabular form, with four sections, Registration, Status, Cashier and Other.
 OR
OR 
The section on the bottom right is the Other area.
Select Point of Sale (POS) => from the Other Section:
 OR
OR 
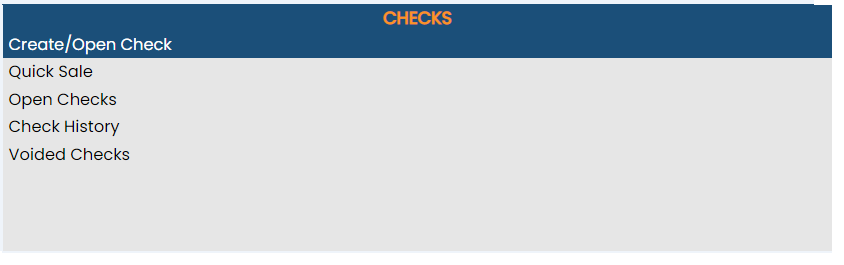
This will open the POS Main Menu, which is divided into two main categories: Checks and Reports.
 OR
OR 
Select Create/Open Check from the Checks section:
 OR
OR 
Note: The Point of Sale (POS) => command in the Configuration area of the Manager's Screen will open the POS Configuration Menu, rather than the POS Menu. The similar commands in different menus open DIFFERENT screens.
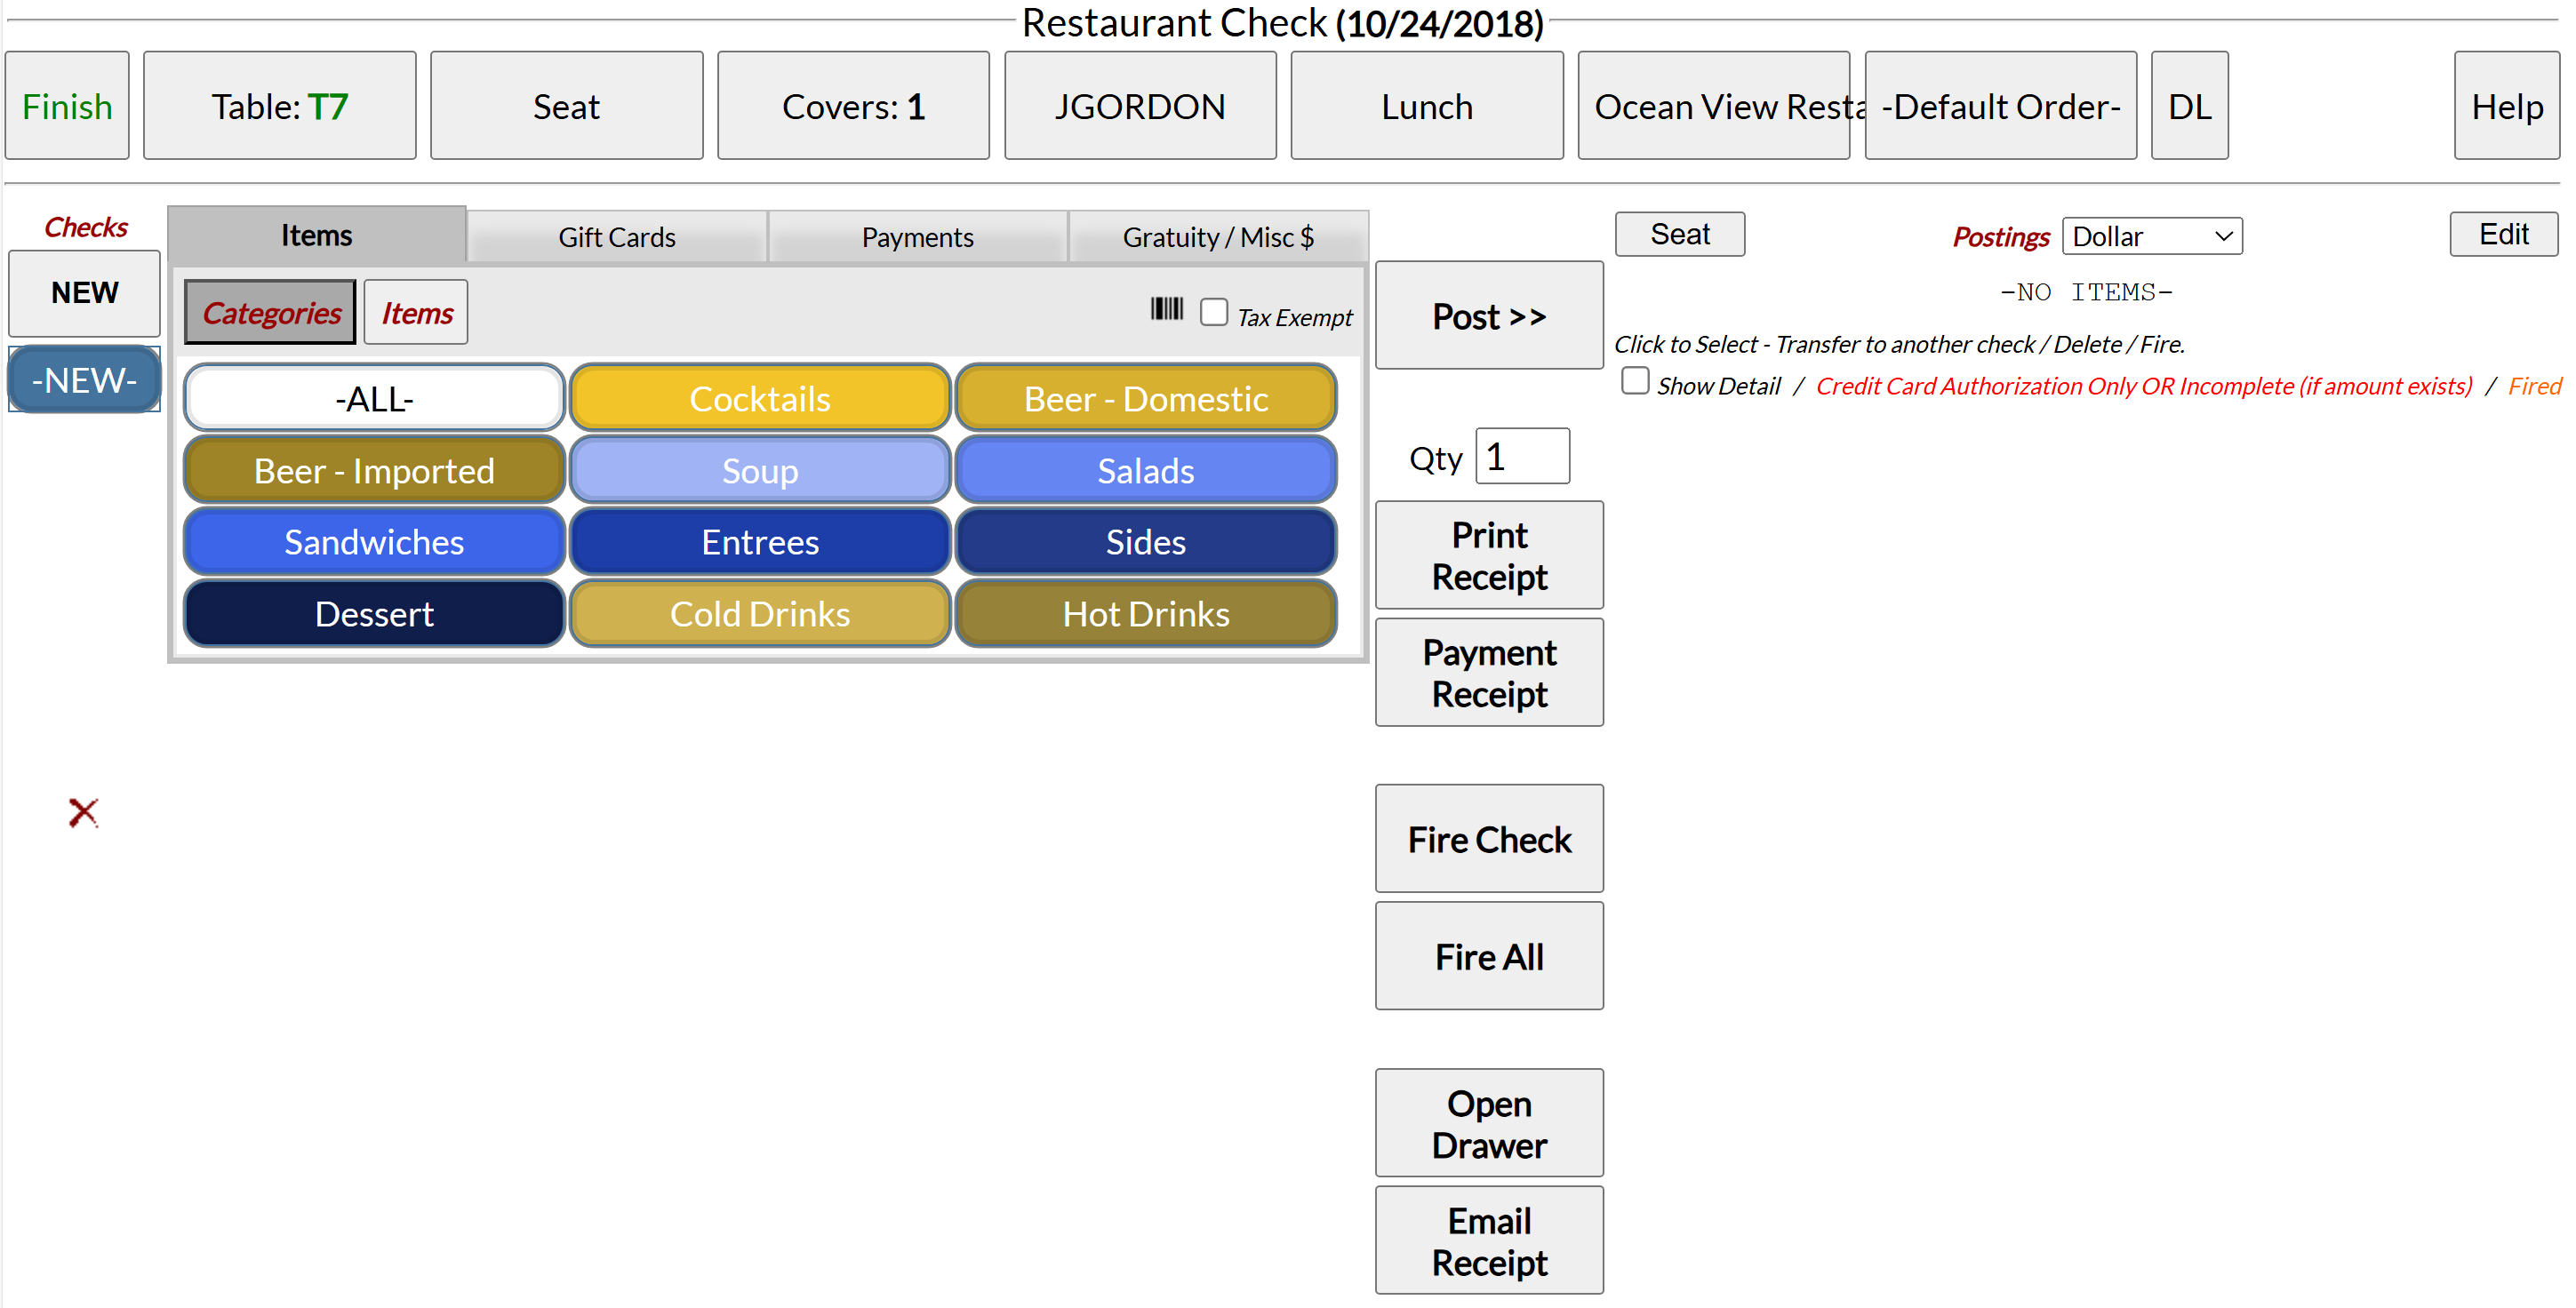
When a check is opened, the Restaurant Check seen will appear.
While initially it appears complex and holds a large amount of information, it should quickly become easy for the user to navigate.
Note: IF the Prompt for Covers on a New Check function has been enabled, when the screen first opens, it will automatically prompt (with a pop up box) that the server selects covers for the check. The Check screen will be grayed out until the OK button on the pop-up message box is clicked, then the Covers option will automatically open for the server to pick the number of covers to be associated with the check. One the appropriate number of covers is selected, the Postings area will appear.

As can be seen, the top section displays the screen title and current system date, above several buttons for specifying the Check parameters.. 
The buttons will show the current selected options for the check shown on screen. Most of these options used for defining the check are also available on the Restaurant Log In page and may therefore already represent the actual check being handled, but may be modified here if not. See also Modify an Open Check.

Note: The user is AUTOMATICALLY LOGGED OUT when opening the restaurant log in page.
Important: The check itself is not officially "open" until a check with a check number has been created (rather than simply saying "NEW"). Usually this occurs when a menu item has been posted to the check. If you exit out of the Restaurant Check screen before this, a check number will not be created.
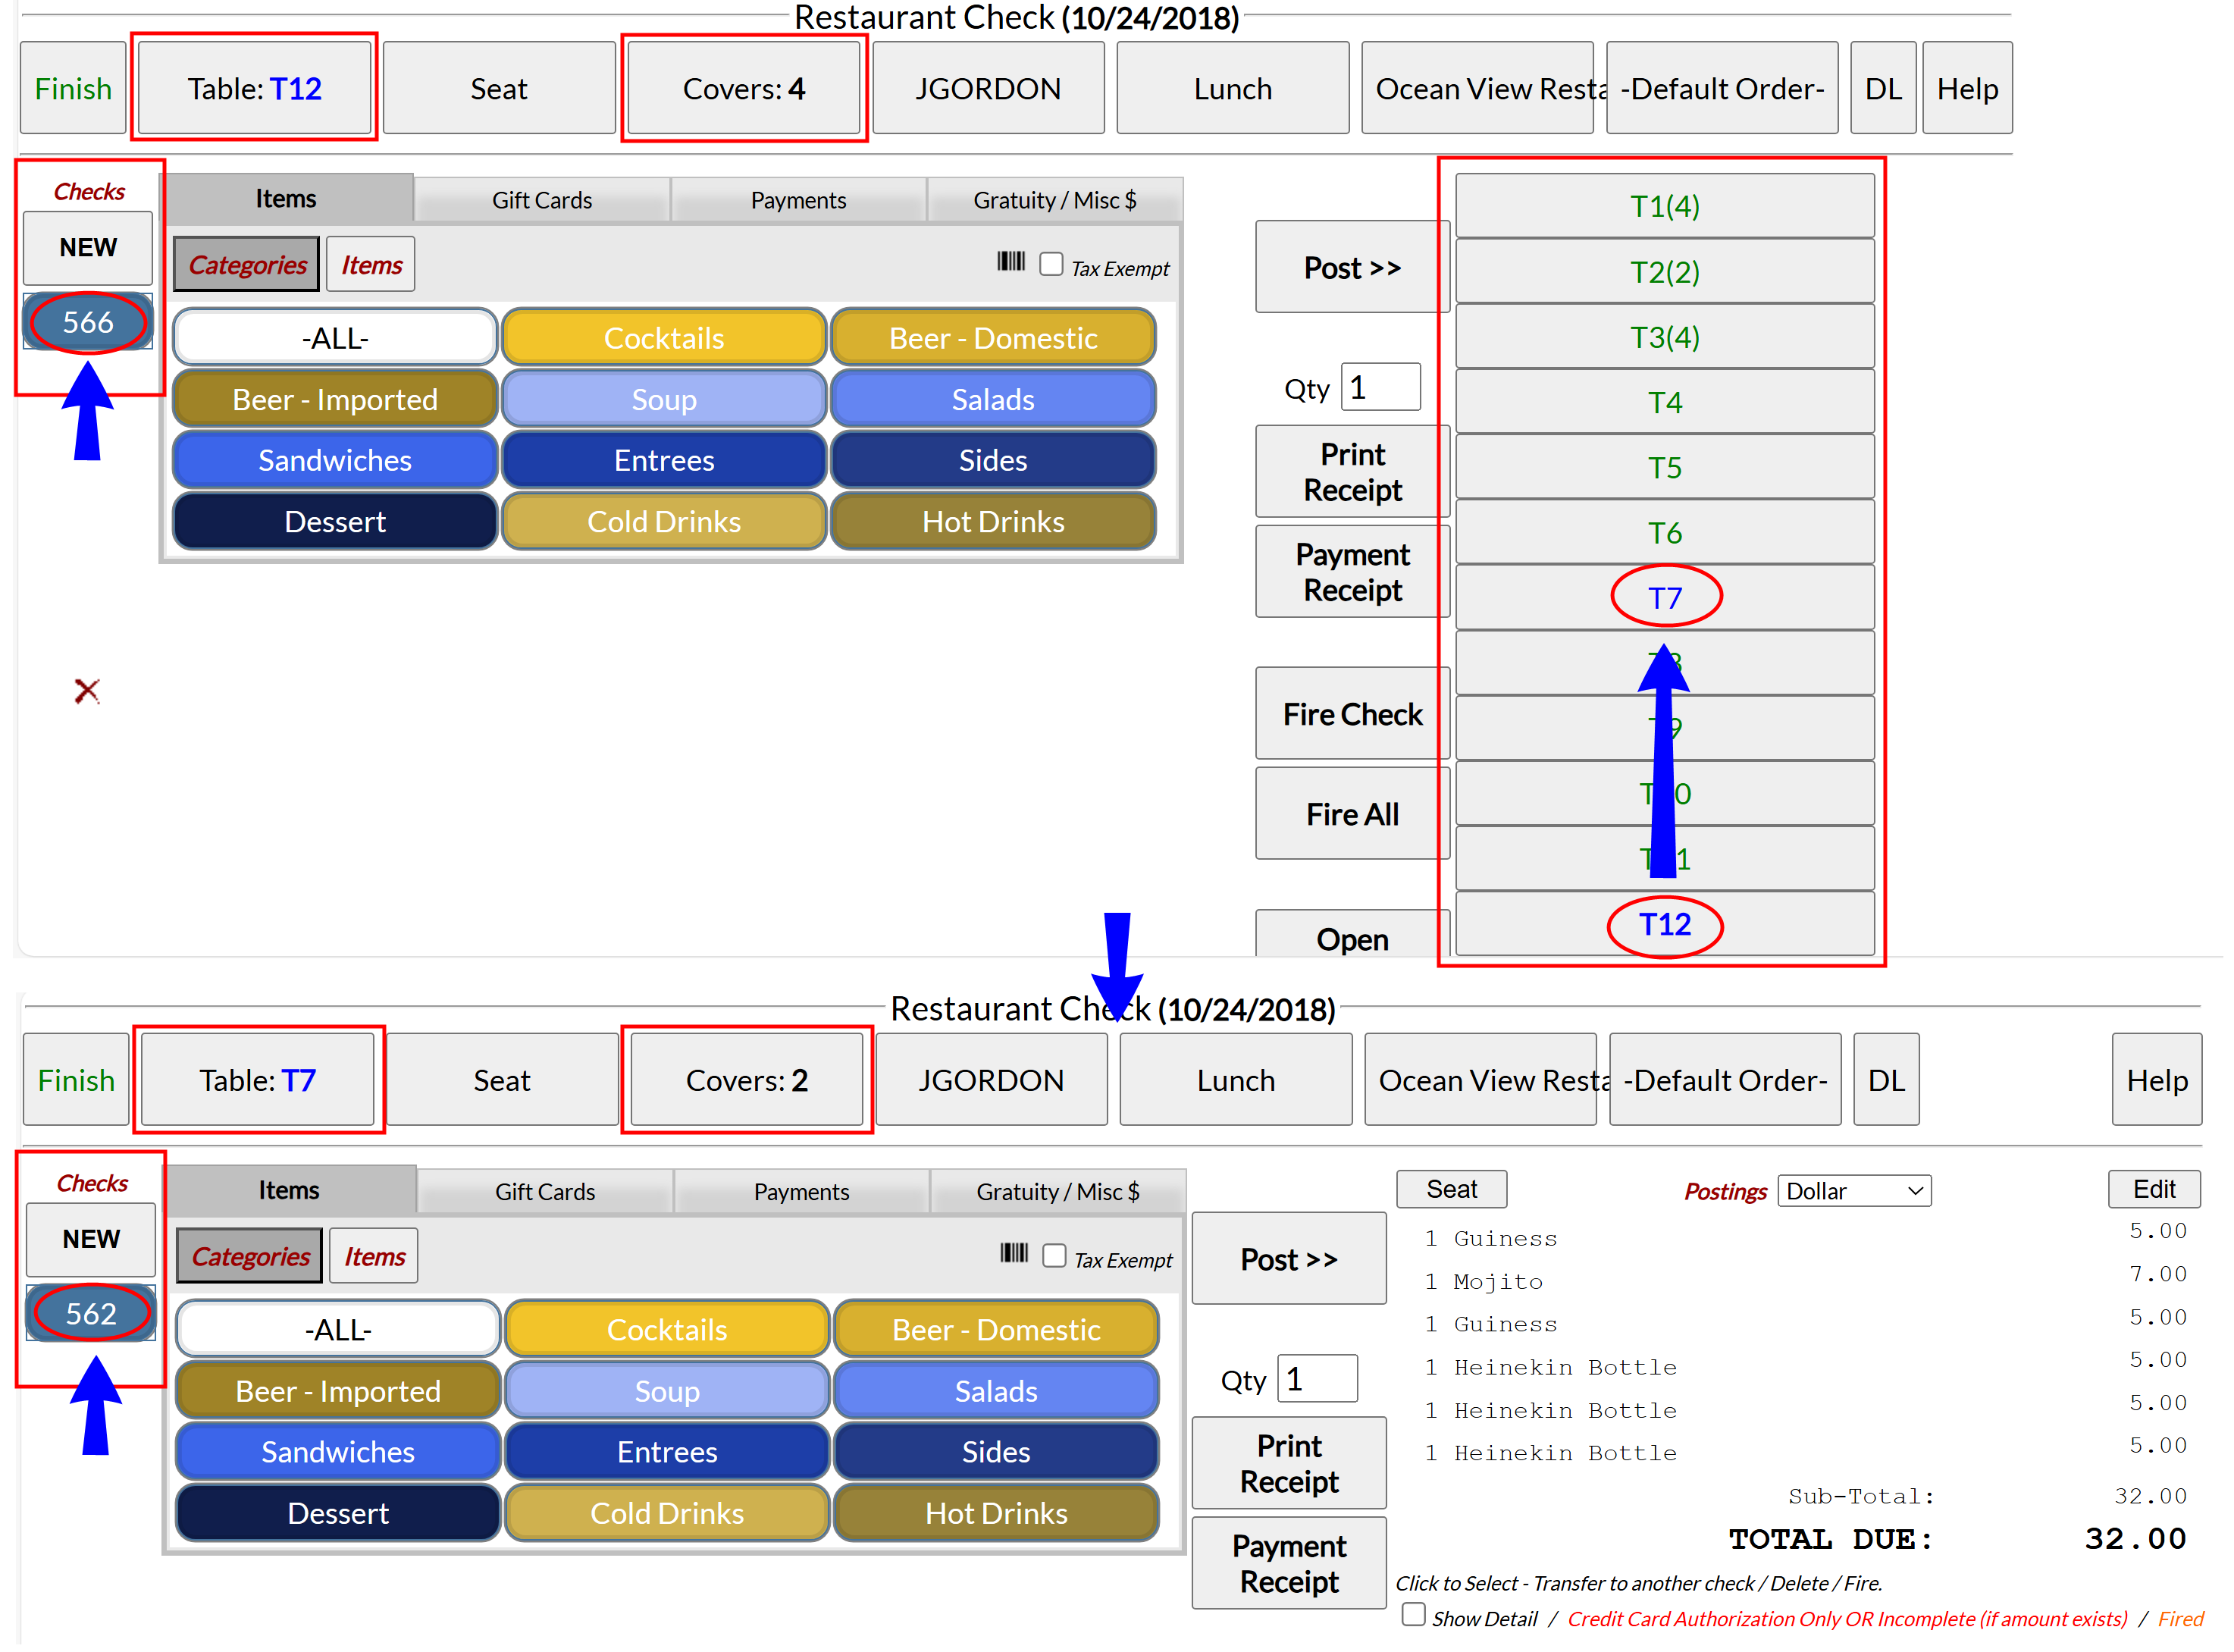
Clicking on it will cause the list of tables for the restaurant or area to appear in place of the Postings area, with the currently assigned table shown in BLUE BOLD, and all available tables shown in GREEN. Selecting a table shown in GREEN will cause a pop up message to appear, asking if the table should be moved or merged. (Selecting the current table will result in a message stating that the table is already selected). If you click "OK" the table will be moved to the new selection.

Note: ALL tables currently occupied by open checks for the User in question will be shown in BLUE, with only the current check shown in BLUE BOLD. Selecting a different table shown in BLUE results in the same pop up message appearing, however clicking "OK" here will MERGE the two checks, with the check number assigned to the table the merge was made with being the retained number. The other check number will be removed (but not re-used subsequently). If you merge checks you may also need to change the number of covers, as this will still reflect the selected number for the check originally at the table.
Note: The Create a Quick Sale Check screen and the Restaurant Check screen are the same, except that the "Table" button displays -NONE-.
Using the Seat button drop-down menu allows you to specify a seat position associated with a particular order/items ordered.
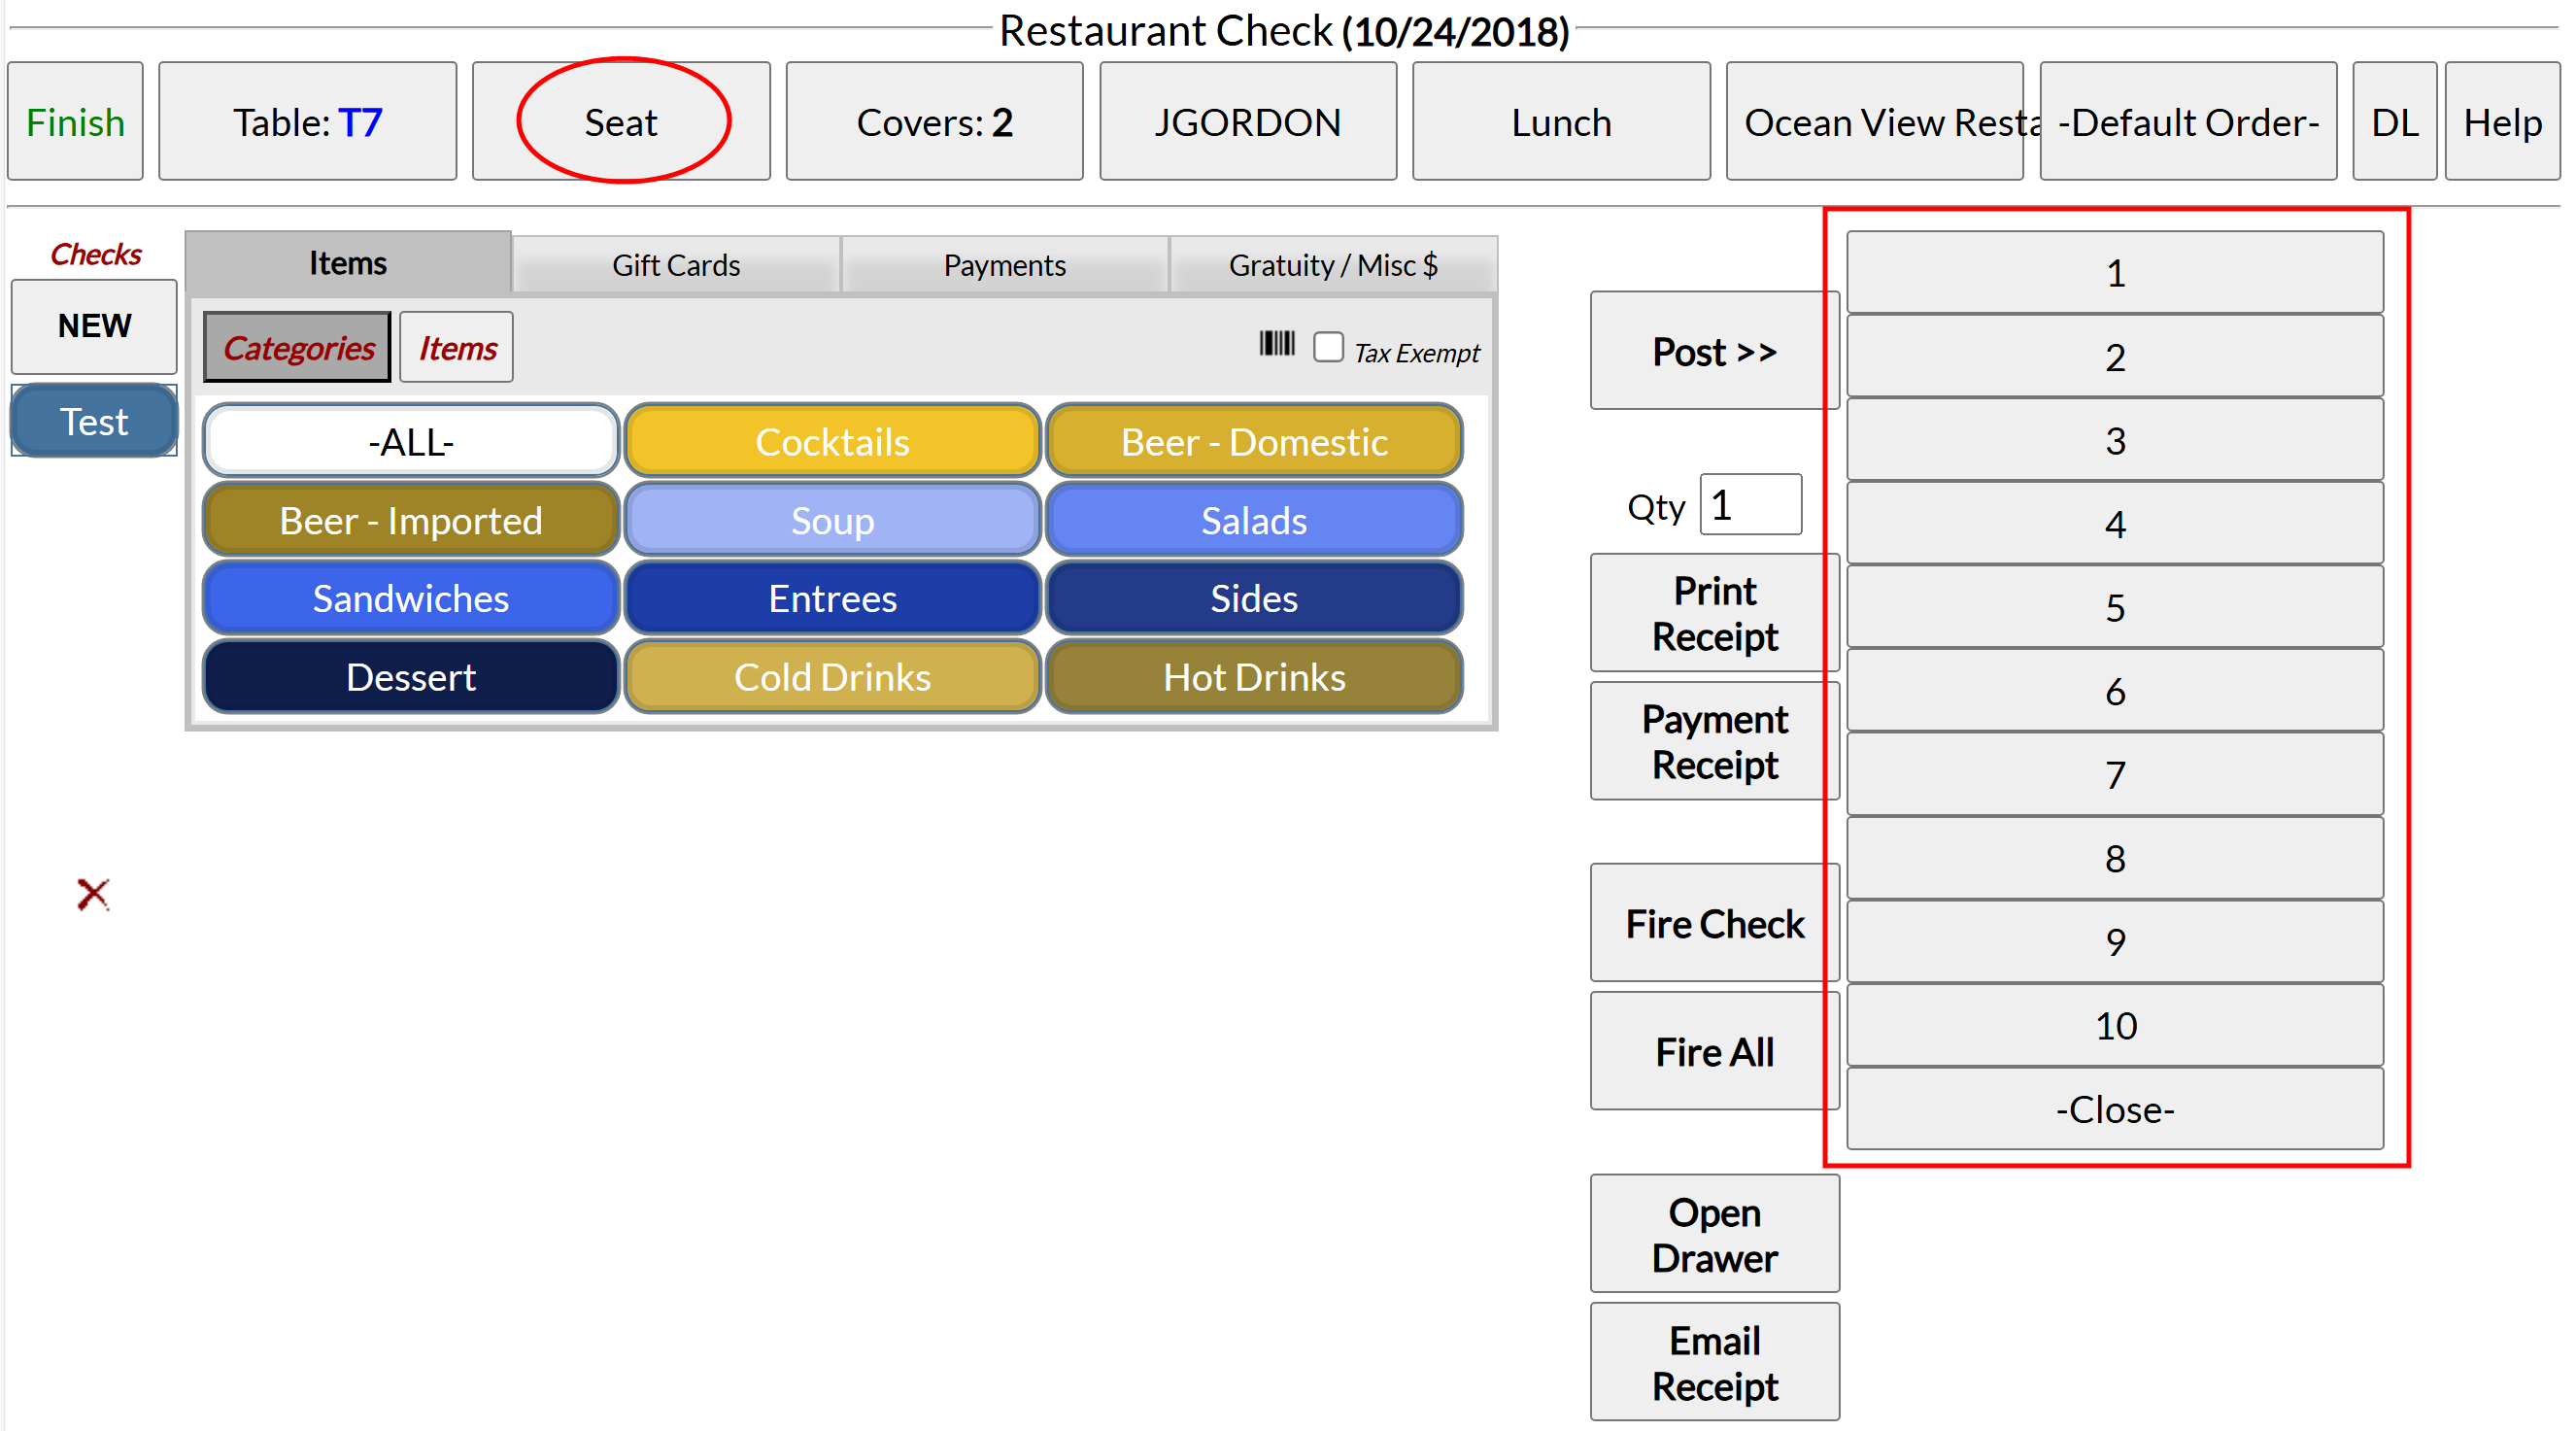
This is a useful option when multiple guests are sitting at a table on the same check. In general, seats are selected when adding items to the check, but can be edited at any time. Each table entered into Skyware will have a number of seats assigned to it.
Note: Due to the Seat option being associated with menu orders, selecting a seat number option WILL generate a check number for the check, even if no order has yet been placed.
Use the Covers button drop-down menu to select the number of customers to be included on this check. The current selection is shown in BOLD.

Again, IF the Prompt for Covers on a New Check function has been enabled, when the screen first opens, it will automatically prompt (with a pop up box) that the server selects the number of covers for the check.
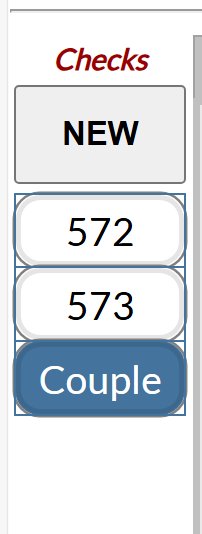
Note: If necessary, you can have multiple checks for each table if wished, however each check will have their own Restaurant Check screen for modifications. Open a new check for each guest as you take their order. (Under Checks (left hand side of Restaurant Check page) click the NEW button. This will generate a new check with a check number displayed below the NEW button. You can repeat this as many times as you need checks. Each one will be given a different number). Click between them to post items to each check - the currently picked check is displayed in blue, the others are in white. The new check is a separate open check and is treated as such during payment. See also How to Split a Check. Be sure to select the correct number of covers for each separate check at the table.
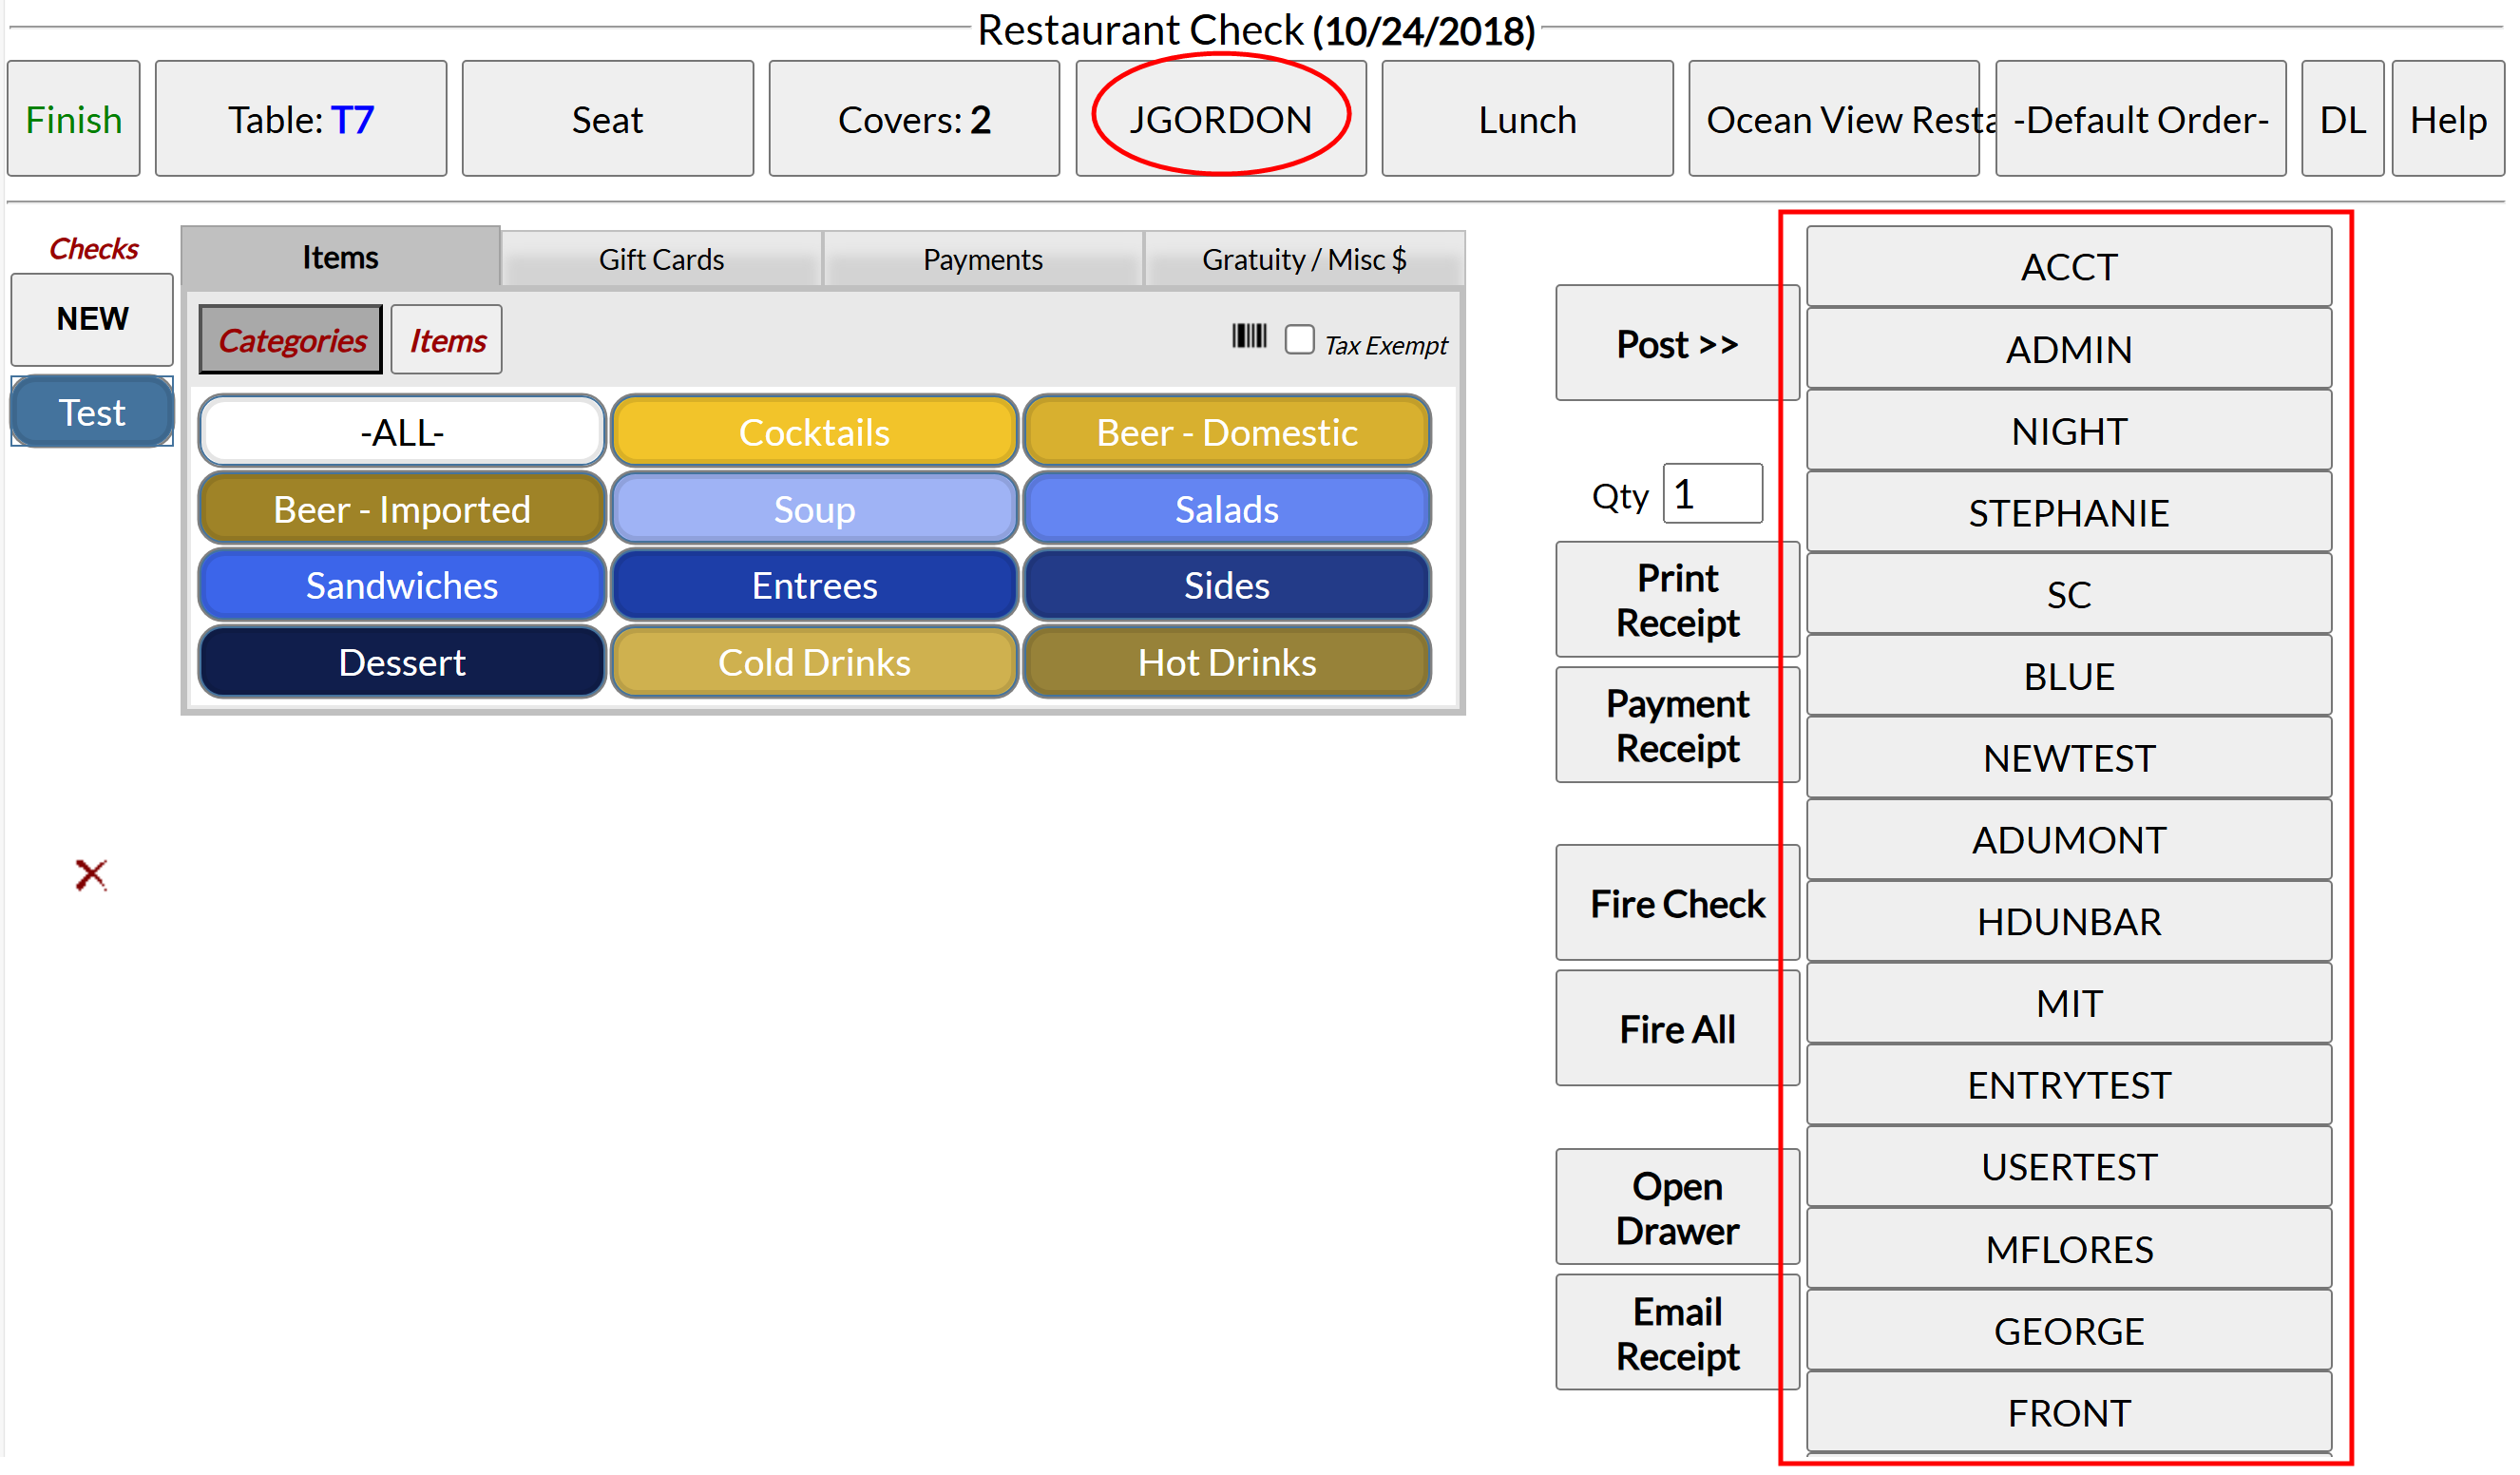
By default this displays the User who opened the check. However as circumstance may change, you may select a different server from the drop-down menu at any point on an open check.
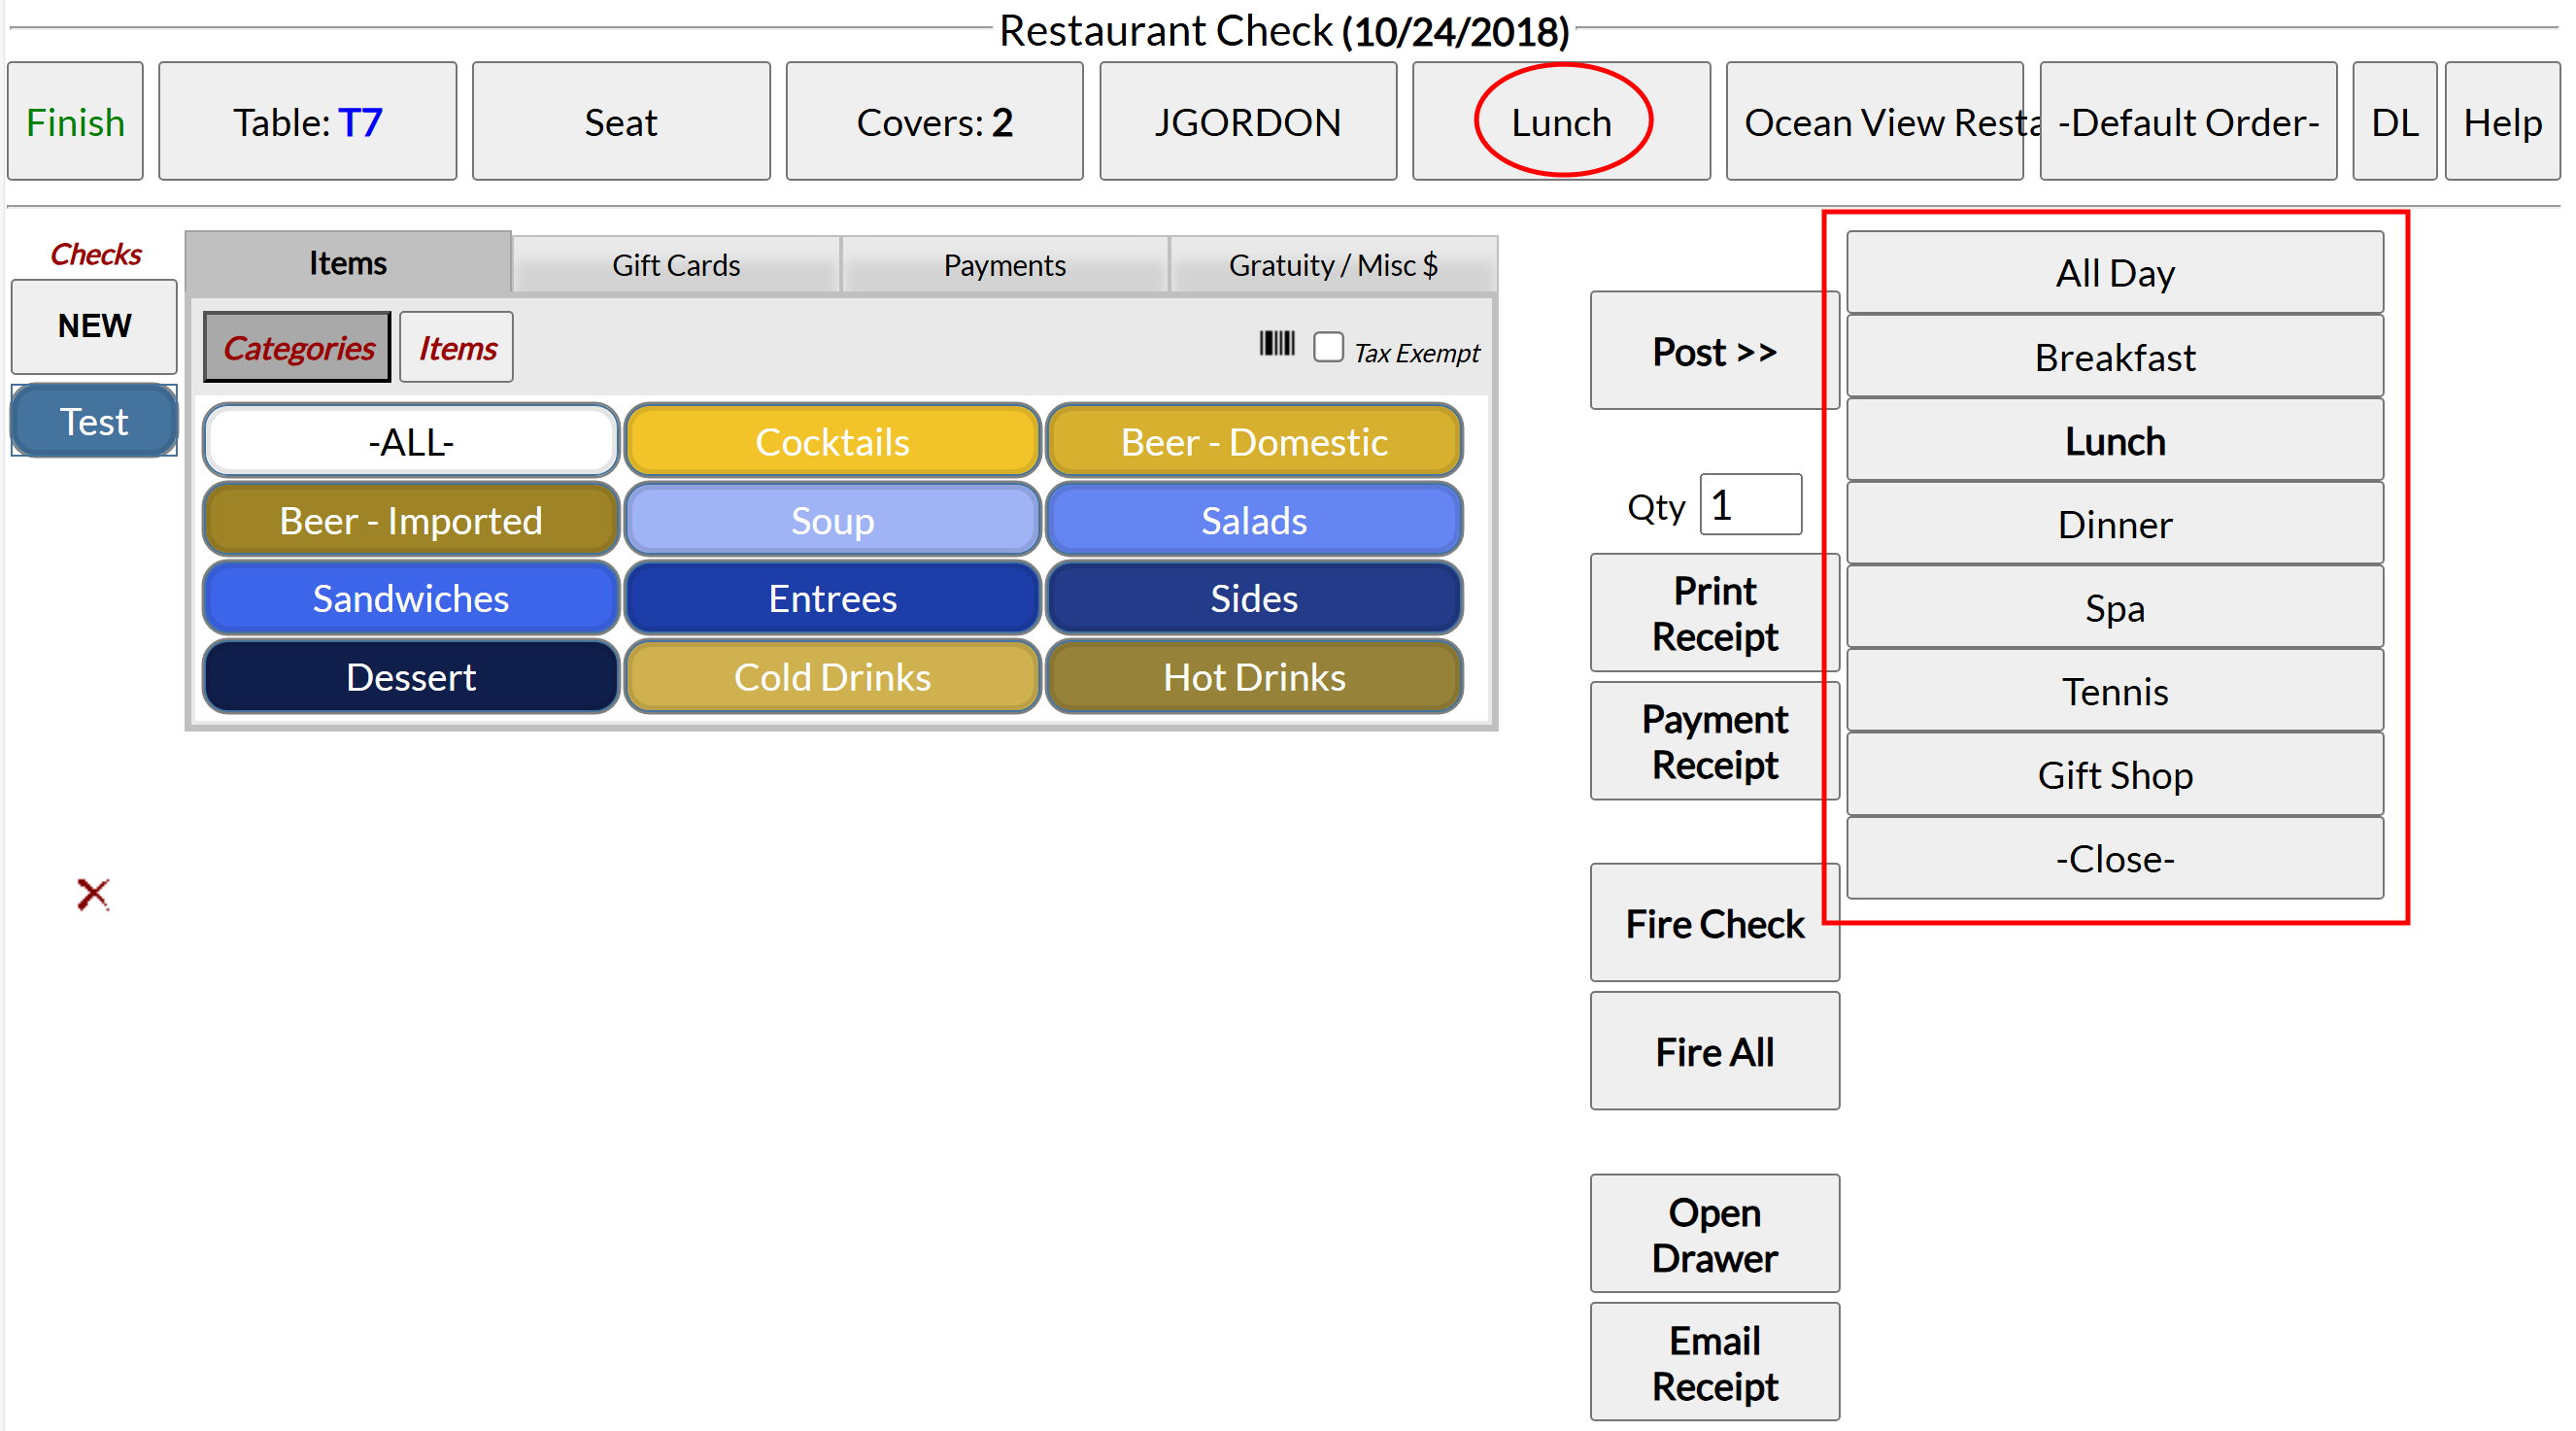
By default this displays the option chosen on the main Restaurant Log In page, but can be changed as wished.
Note: Keep in mind that the Meal Period determines what menu items are available to post to the check.
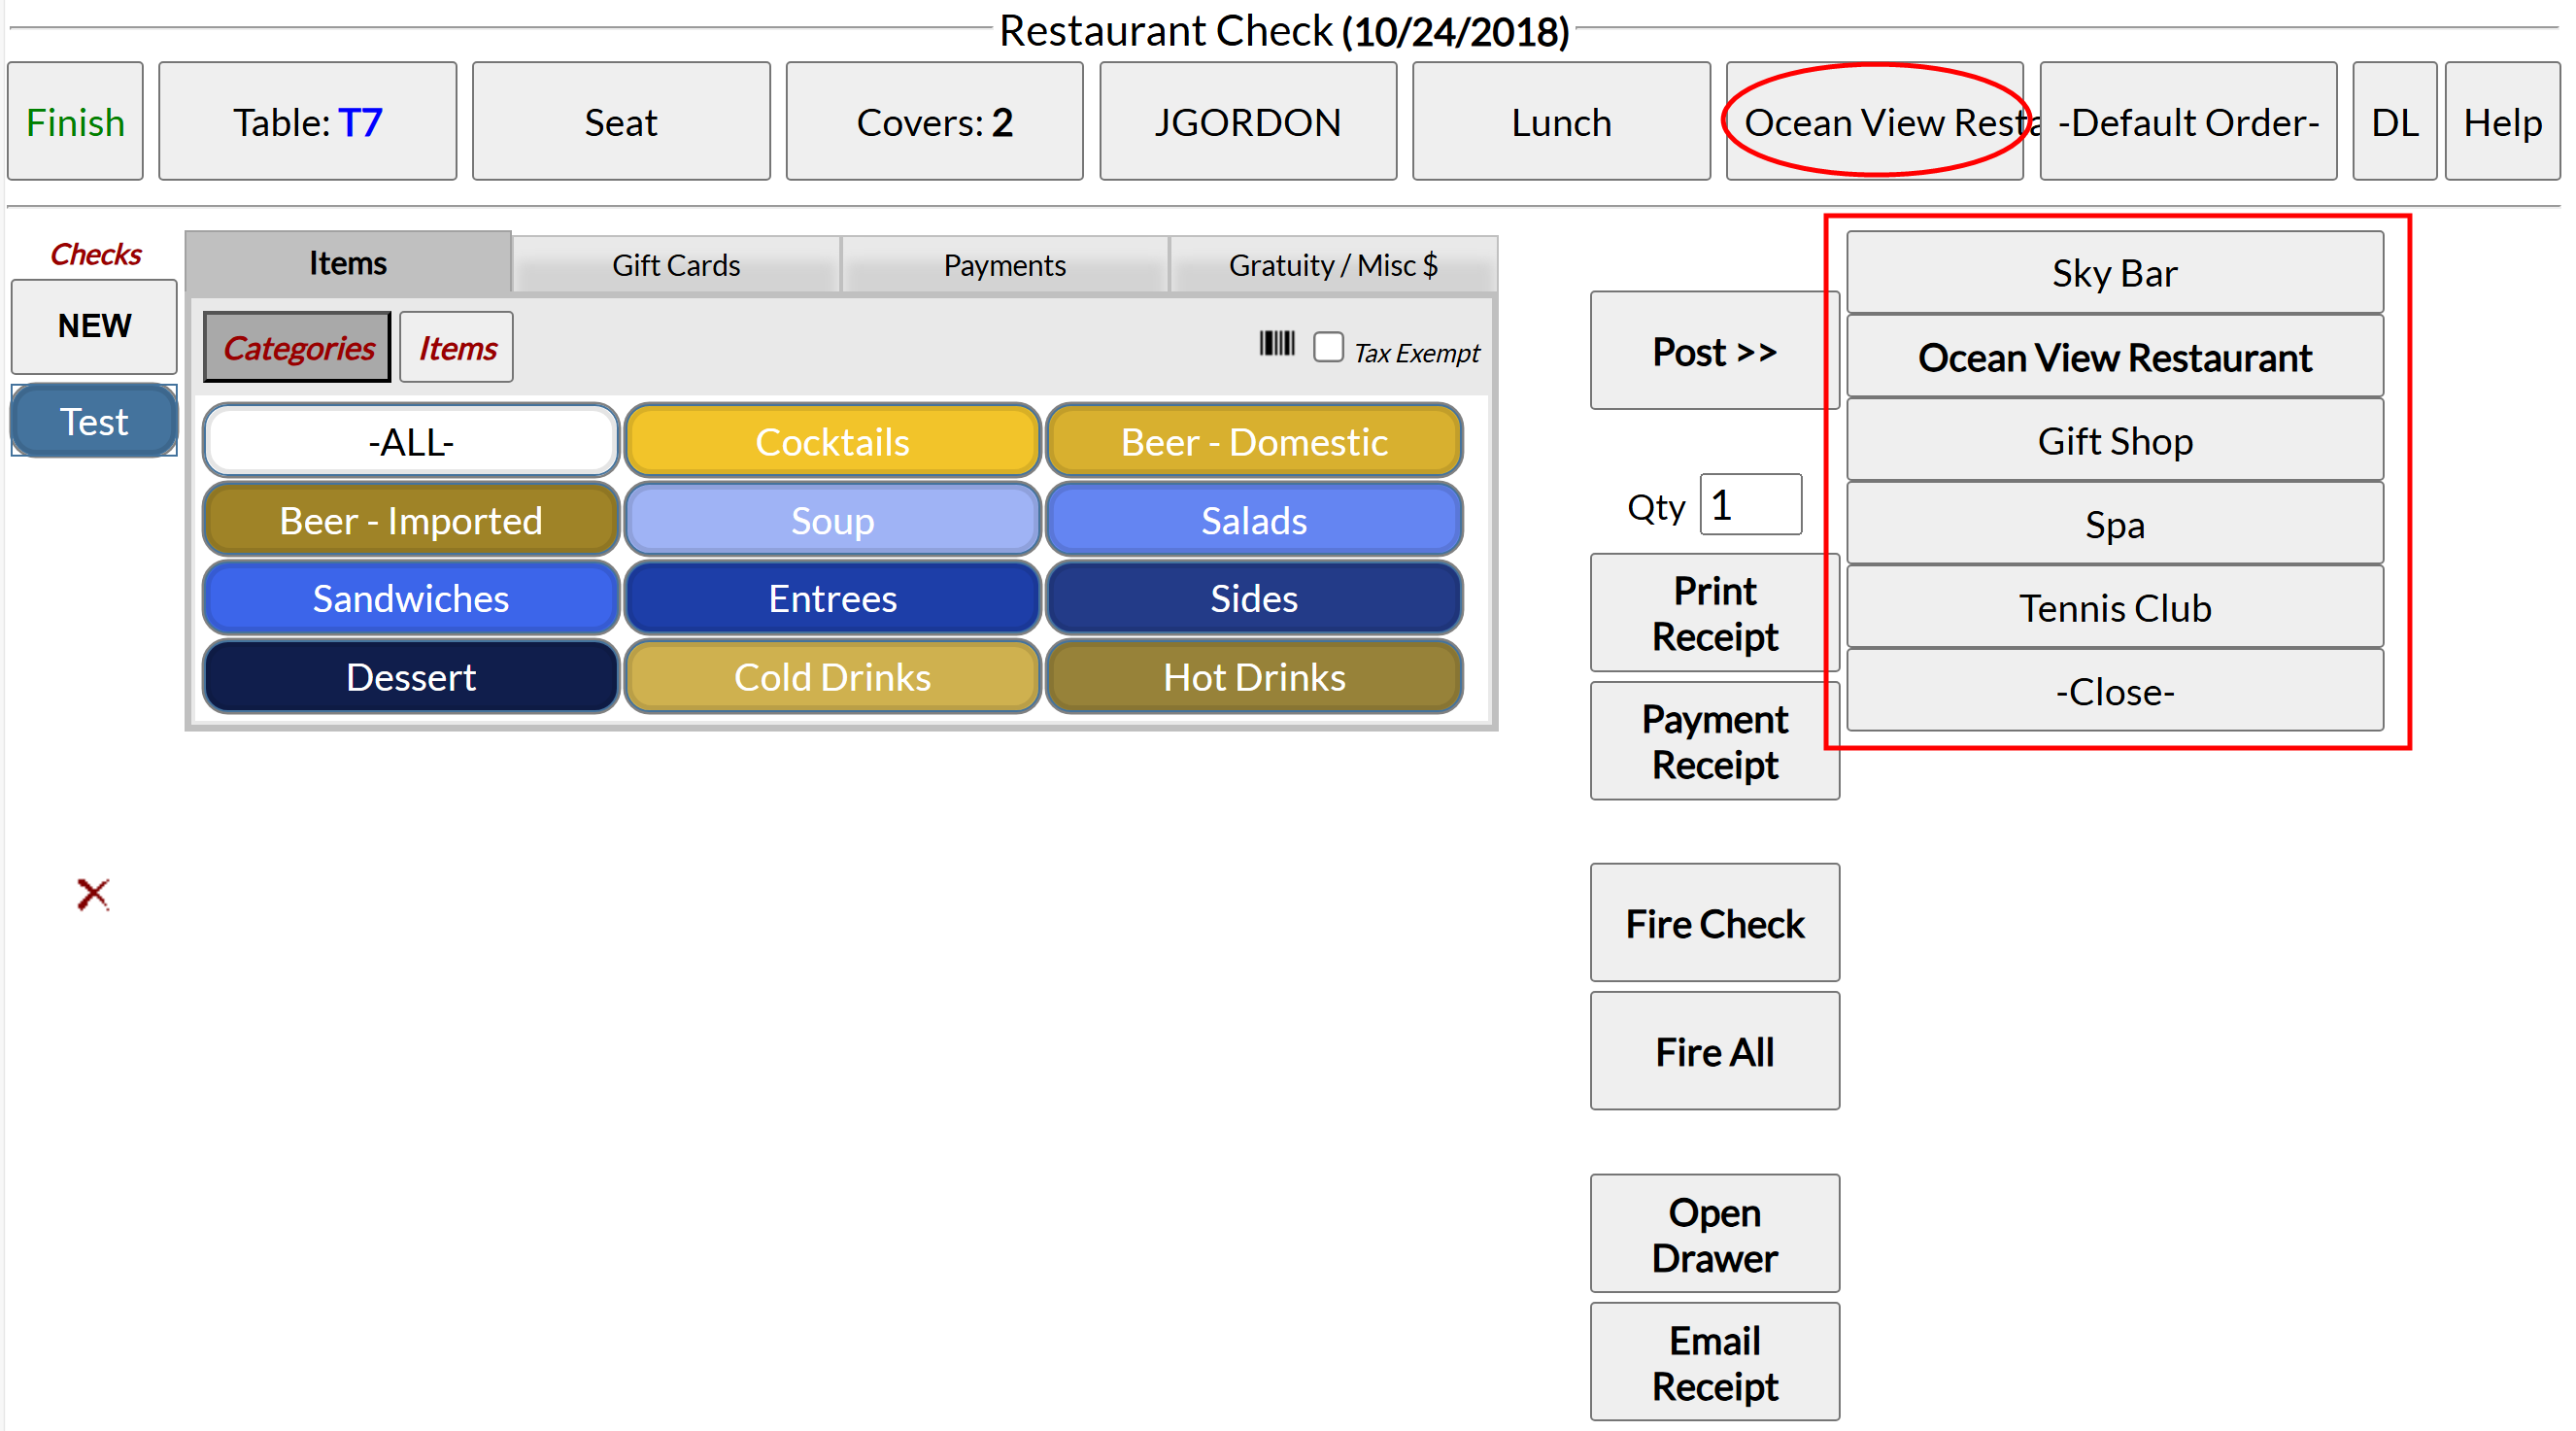
By default this displays the option chosen on the main Restaurant Log In page, but can be changed as wished.
Note: Again, keep in mind that the selected Restaurant option also determines what menu items are available to post to the check.

By default menu options are grouped for firing in no specific order other than as entered. A different set of default firing options (drinks, then appetizers etc) can be set via the configuration options if desired; if so, a drop-down list will include the option to switch to a different order. For more information, see the Firing Order Help section or go to the POS Configuration Menu to modify.

If available, it allows the User to scan ID from the guest(s) to prove their eligibility for purchasing alcohol. This optional button requires the purchase of a Drivers License scanner for functionality, but may be added to any Point of Sale (POS).

This button leads directly to the help topic for the Restaurant Check screen within the Help section of Skyware, and allows access to the entirety of the Help section without requiring that the User log into the main Skyware system.
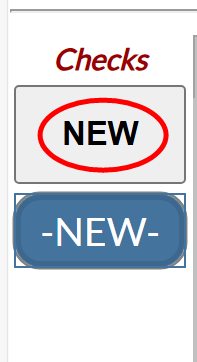
Open checks are shown on the left side of the Restaurant Check screen, in the Checks List section.
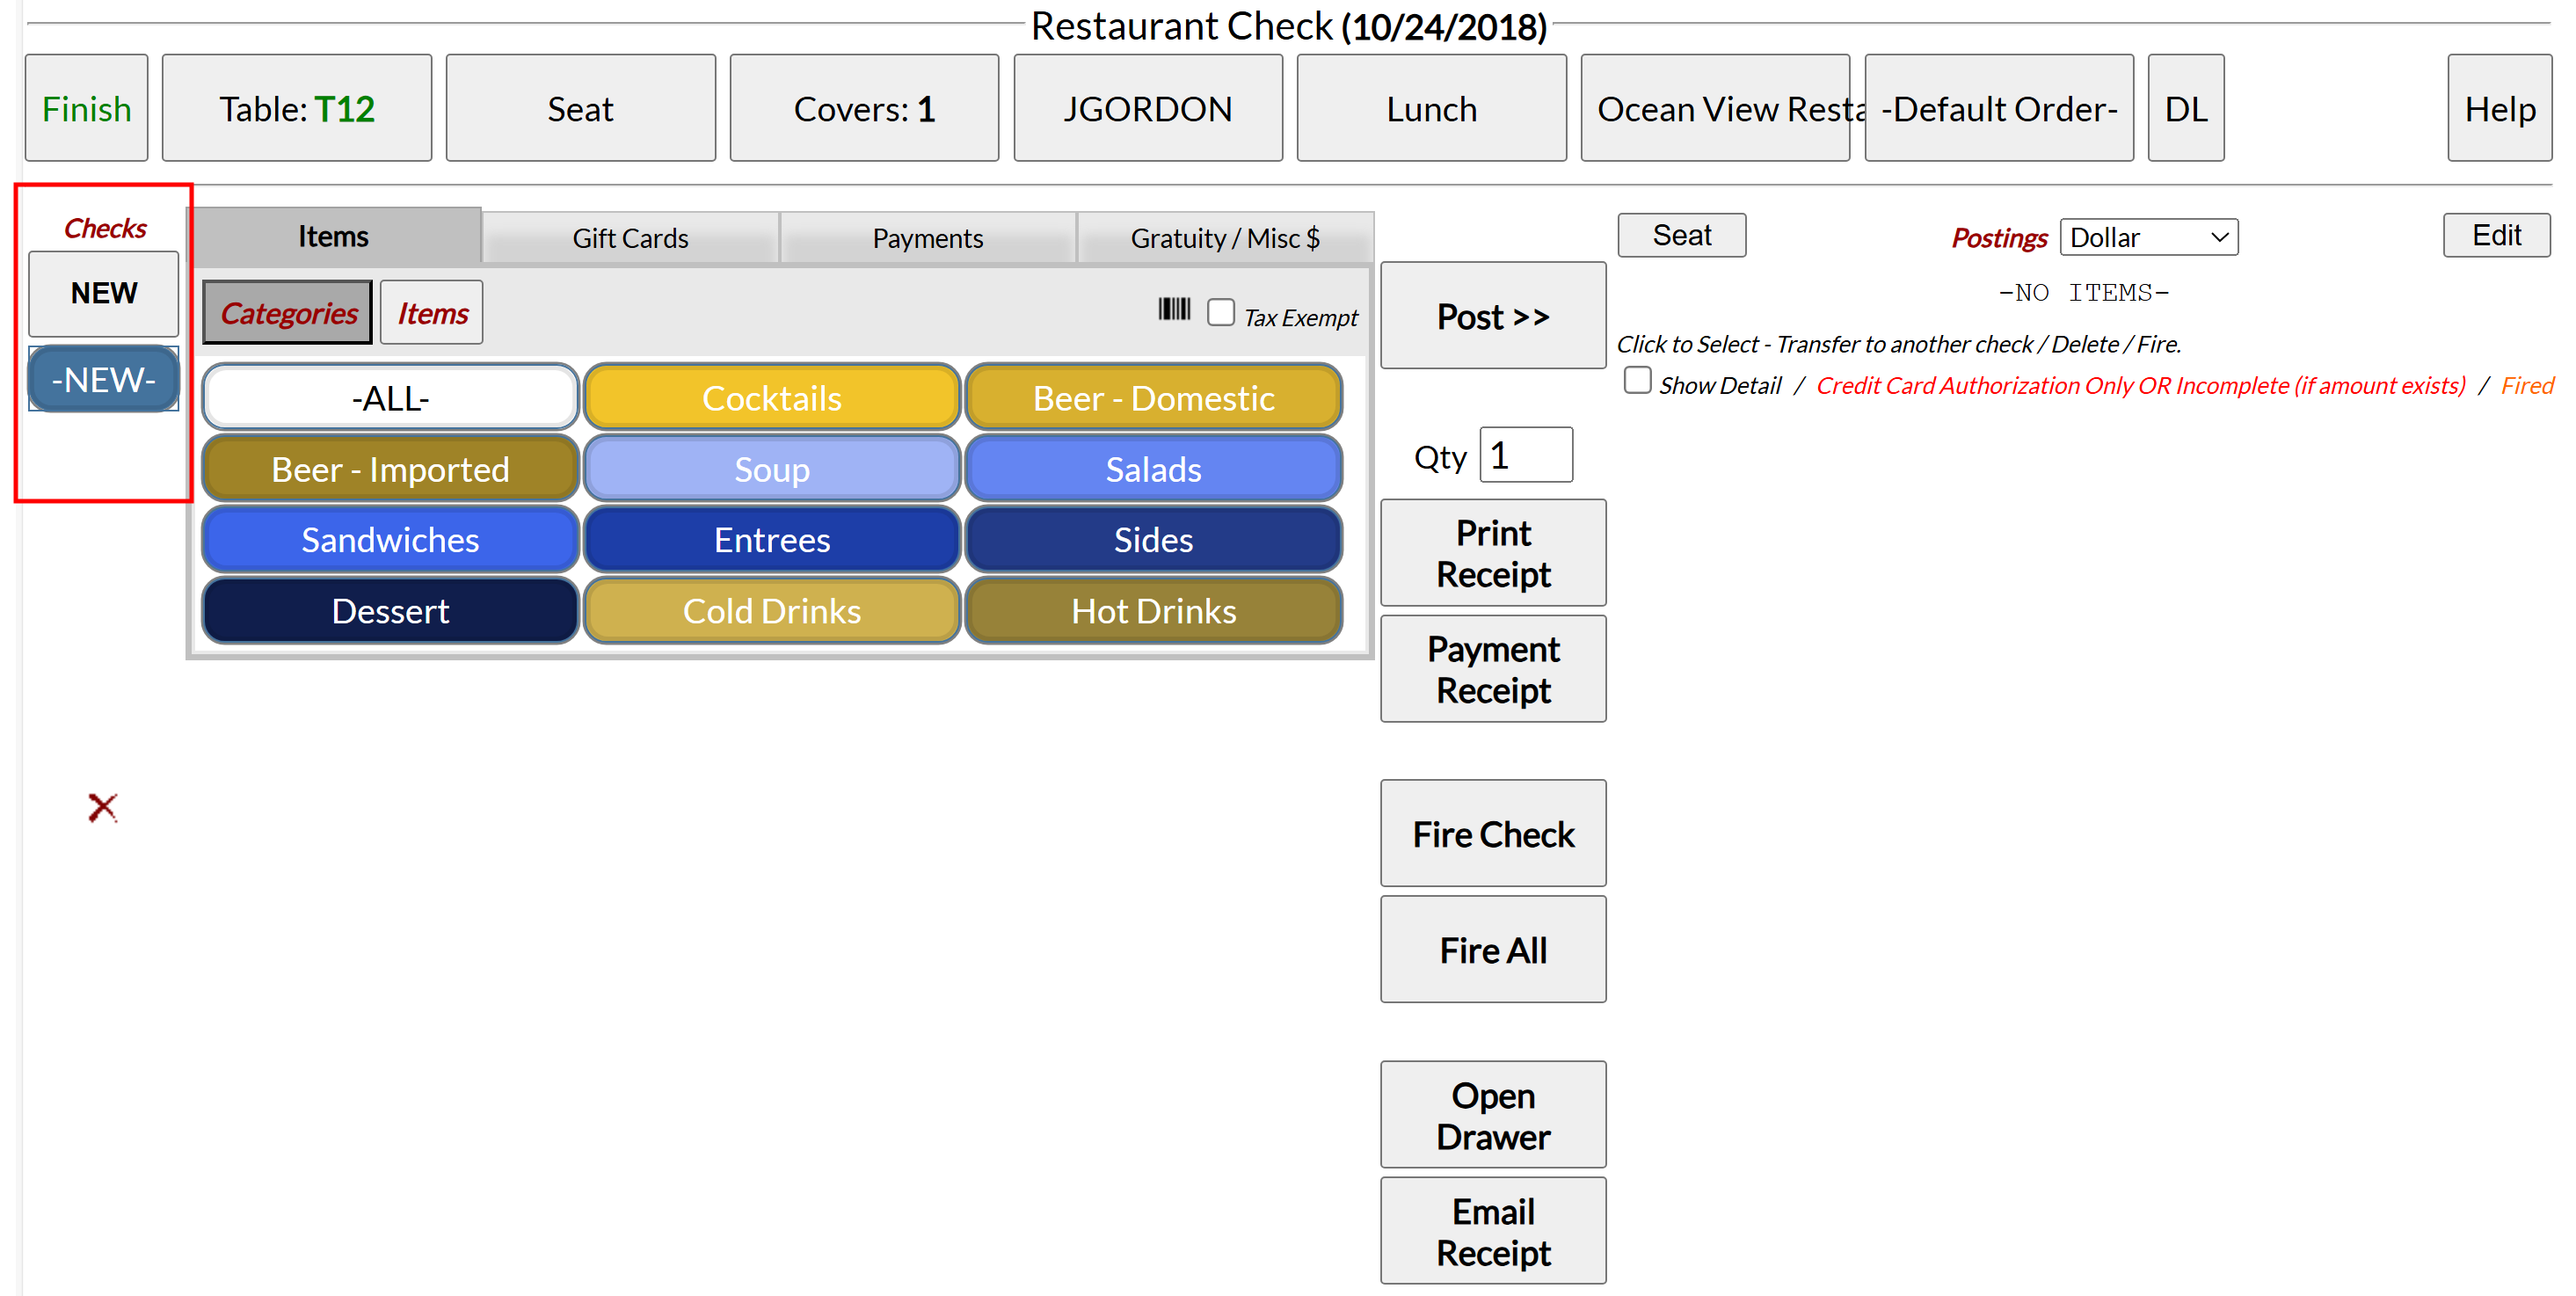
Upon arrival at the Restaurant Check screen, the Checks List section may not contain any check numbers, instead a place marker called "NEW" will be shown, below the New button. A new check is created AUTOMATICALLY after arriving at the Restaurant Check screen by posting any menu item to the Postings list on the right side of the screen. This will open a check, with a specific check number. This check number is displayed below the NEW button. You may also generate a new check at any time by clicking the New button.
Note: The check itself is not officially "open" until a check with a check number has been created (rather than simply saying "NEW"). Usually, this occurs when a menu item has been posted to the check, but may also occur if one of the check option parameters has been altered on the Restaurant Check screen. If you exit out of the Restaurant Check screen before this, a check number will not be created.
This can be particularly useful if the table wants separate checks generated for their meal. Open a new check at any time simply by clicking the NEW button. This will generate a new check, with a new check number, (in sequential numerical order) that is displayed below the current open check. You can repeat this as many times as you need checks. Each one will be given a different number. Click between them to post items to each check - the currently displayed check is highlighted in blue, the others are in white.

All new checks are separate open checks and are treated as such during payment. ( For further details on splitting a check, see Splitting a Check).
All checks currently open for the table are listed in the Checks list and can each be selected to view or modify. Check numbers are assigned sequentially in Skyware and are not re-used.
Any generated check can be edited, both before or after posting anything to it, to include a name or description as well as a number. It may be useful to change the check name from a number to a word, for example the guest name. Click on the check button to be taken to a screen to edit the name.
This name will be displayed on the Restaurant Check screen in place of the assigned check number, however within Skyware both the number and name will be associated with the check.
Note: From within Skyware, any open check may be viewed using the Open Checks command, which allows you to see a list of open checks, and to select a check to view or modify on the Restaurant Check screen).
An empty check can be removed by clicking the close check button on the right of the screen.

It can also be deleted by clicking on the Delete button. If a check has a zero balance, select the check from the list and click the Delete button located below the Check list.


Note: Closed checks may be viewed using the Check History command, which allows you to view and search through all closed checks in the system. If an empty check is deleted however it will not appear in this list. This can account for why some check numbers appear to be missing from Skyware records, as even though it was deleted the next check to be generated will have the next check number in sequence.
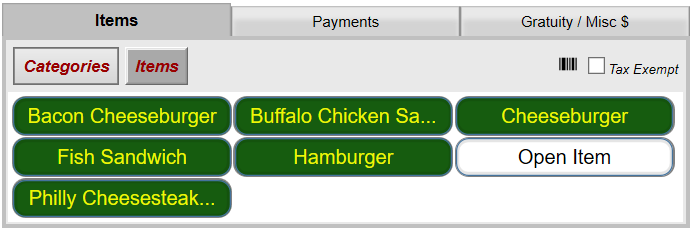
When ready, the Items tab allows you to select menu items to add to the check (see Add, Remove or ReOrder Menu Items from an Open Check).
This tab is displayed automatically when the Restaurant Check screen is first opened.

There are two possible options for display in the Menu Items tab, Categories or Items. Categories lists the types of food items, sub-divided into groups (beverages, sandwiches etc) set by your Property, and is shown by default. Items shows all menu items in a list. This option is used mainly if there is a small number of choices, reducing the number of steps. However, the list becomes overwhelmingly large easily and is thus more useful sub-divided into Categories to begin with.
From the Categories list, select a category of food item by clicking on it.
This selection determines what items appear in the Menu Items list.
For example, selecting Sandwich as a Category, will then show the types of sandwich available, such as Cheeseburger, Hamburger, or Fish Sandwich.
From the Menu Items list, select the item ordered by the customer by clicking on it.
This will automatically take you to the preparation list, which includes the possible ways the selection can be modified.
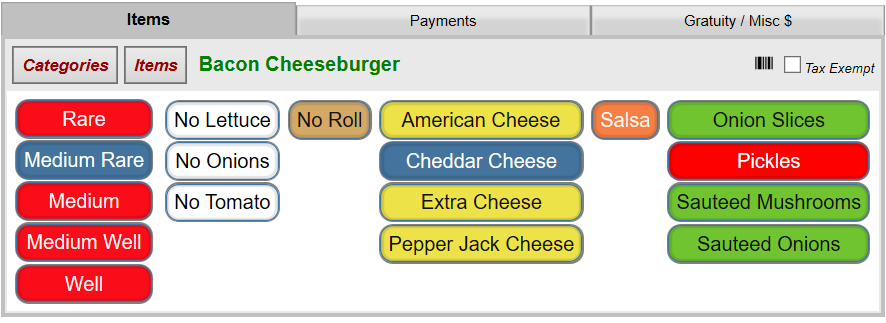
From the Preparations list, select a preparation for the selected menu item, if available.

For example, if you select Bacon Cheeseburger as a Menu Item, your preparation options may include Rare, Medium, and Well Done.
From the Modifiers list, select any modifiers to apply to the selected Menu Item.
For example, the Bacon Cheeseburger may have mushrooms or sauteed onions available to add on. For sandwiches the Modifiers might include options such as cheese, lettuce, tomatoes, or mayonnaise.
A "NO" can be placed before the modifier or preparation by clicking on the item twice. This turns the selection red in the list and when posted displays the word "NO" on the check.
Use the Qty text box to change the number of selected items to add to the check.
By default this number is one.
It is usually preferable to add items rather than increase the ordered quantity if the items are not ordered by the same person at the table, for ease of separation later. This can also be done by using the Re-Order item button once an item has been posted.
At any point in this process, re-clicking on the Categories button will return you to the beginning of this process.
When the selection is complete, click the Post >> button. This adds the item and any selected options to the check.

Once the selected menu items have been posted to the check, the Postings section on the right side of the screen shows each item added to the check as well as a running total of the charges.
The Postings list on the right side of the screen shows each item added to the check as well as a running total of the charges.
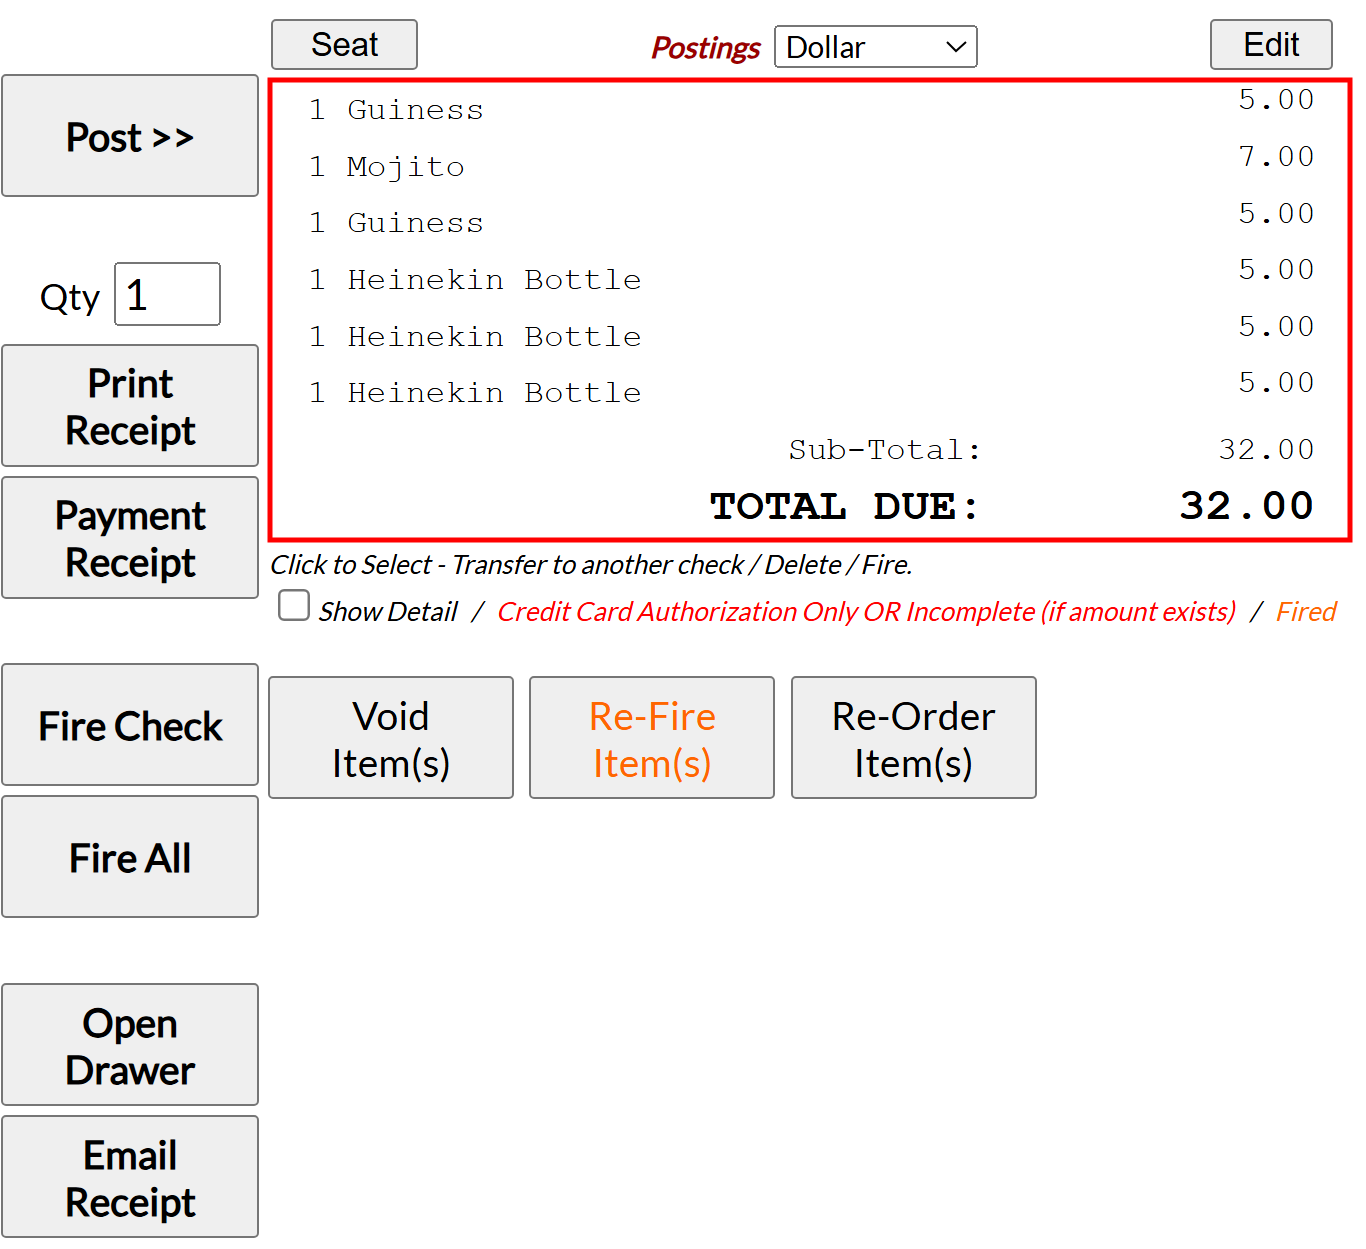
This section also includes several buttons used for dealing with the check.
When a selection from the Menu tab has been made, click the button Post >>. This adds the item (with the price) to the check (Postings List).
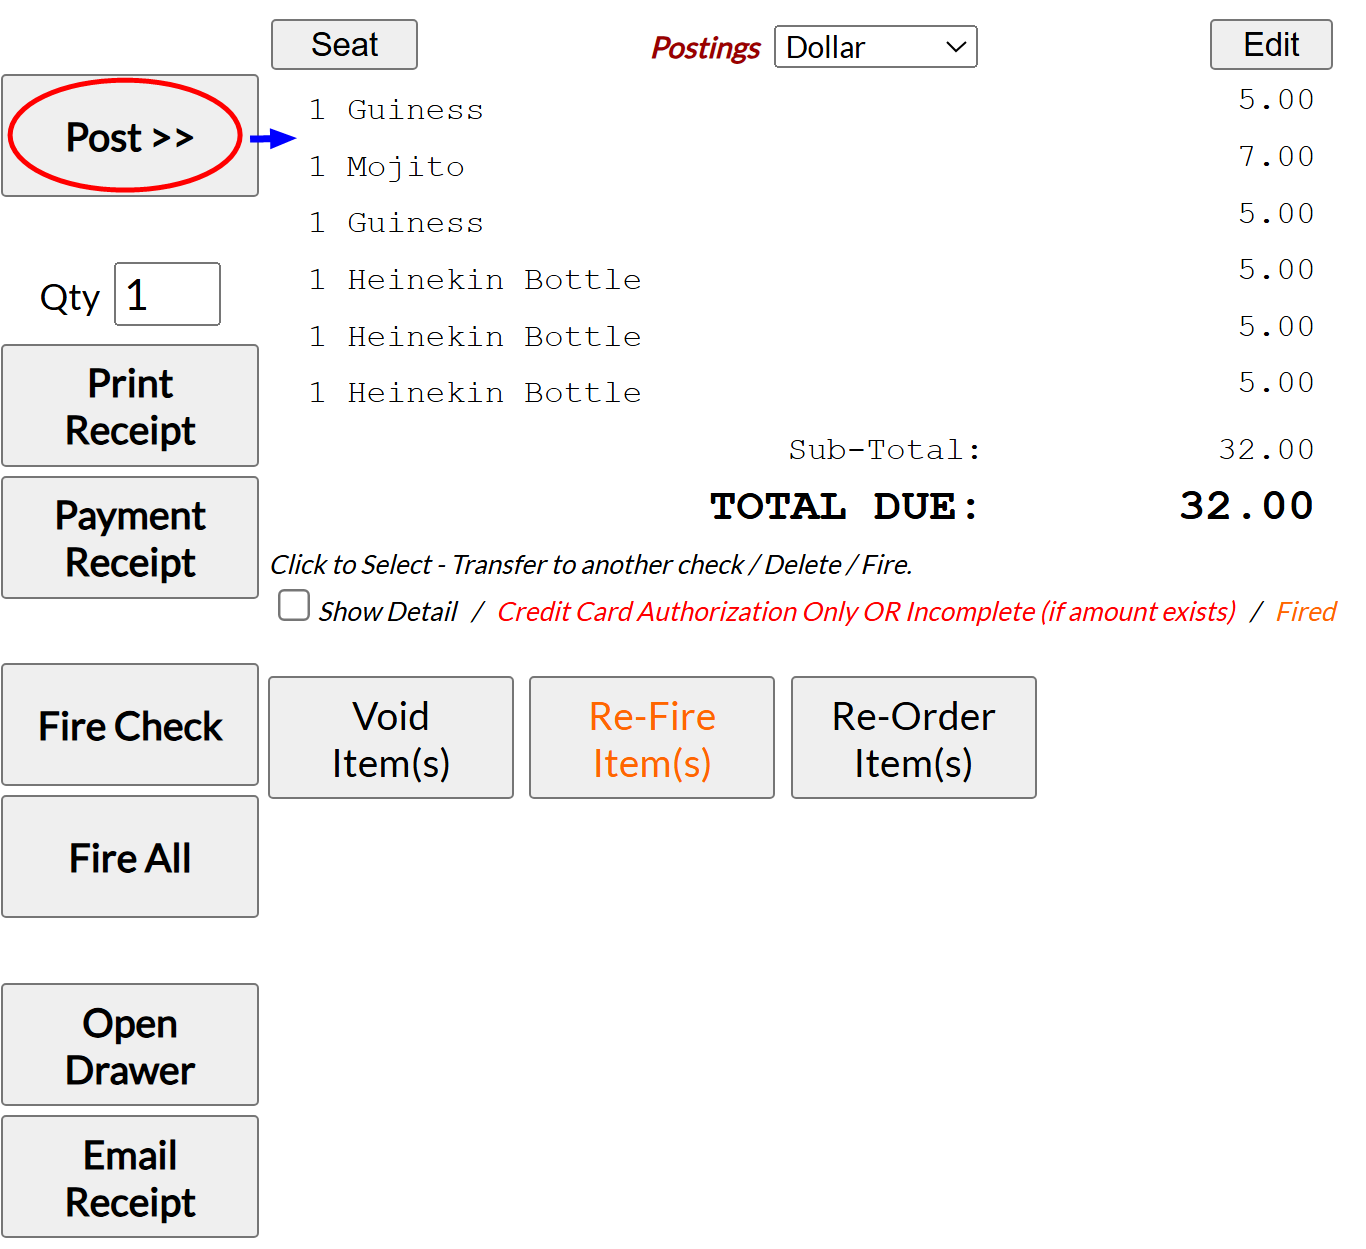
If you wish you reorder an item or items on the same ticket, you can click on the item in the posted list and click on the re-order item(s) box located under the posted list instead of inputting the same thing twice.
Continue adding items until the guest choices have all been entered.
In the Postings list, select by clicking the item to be removed. Multiple items may be selected at one time.
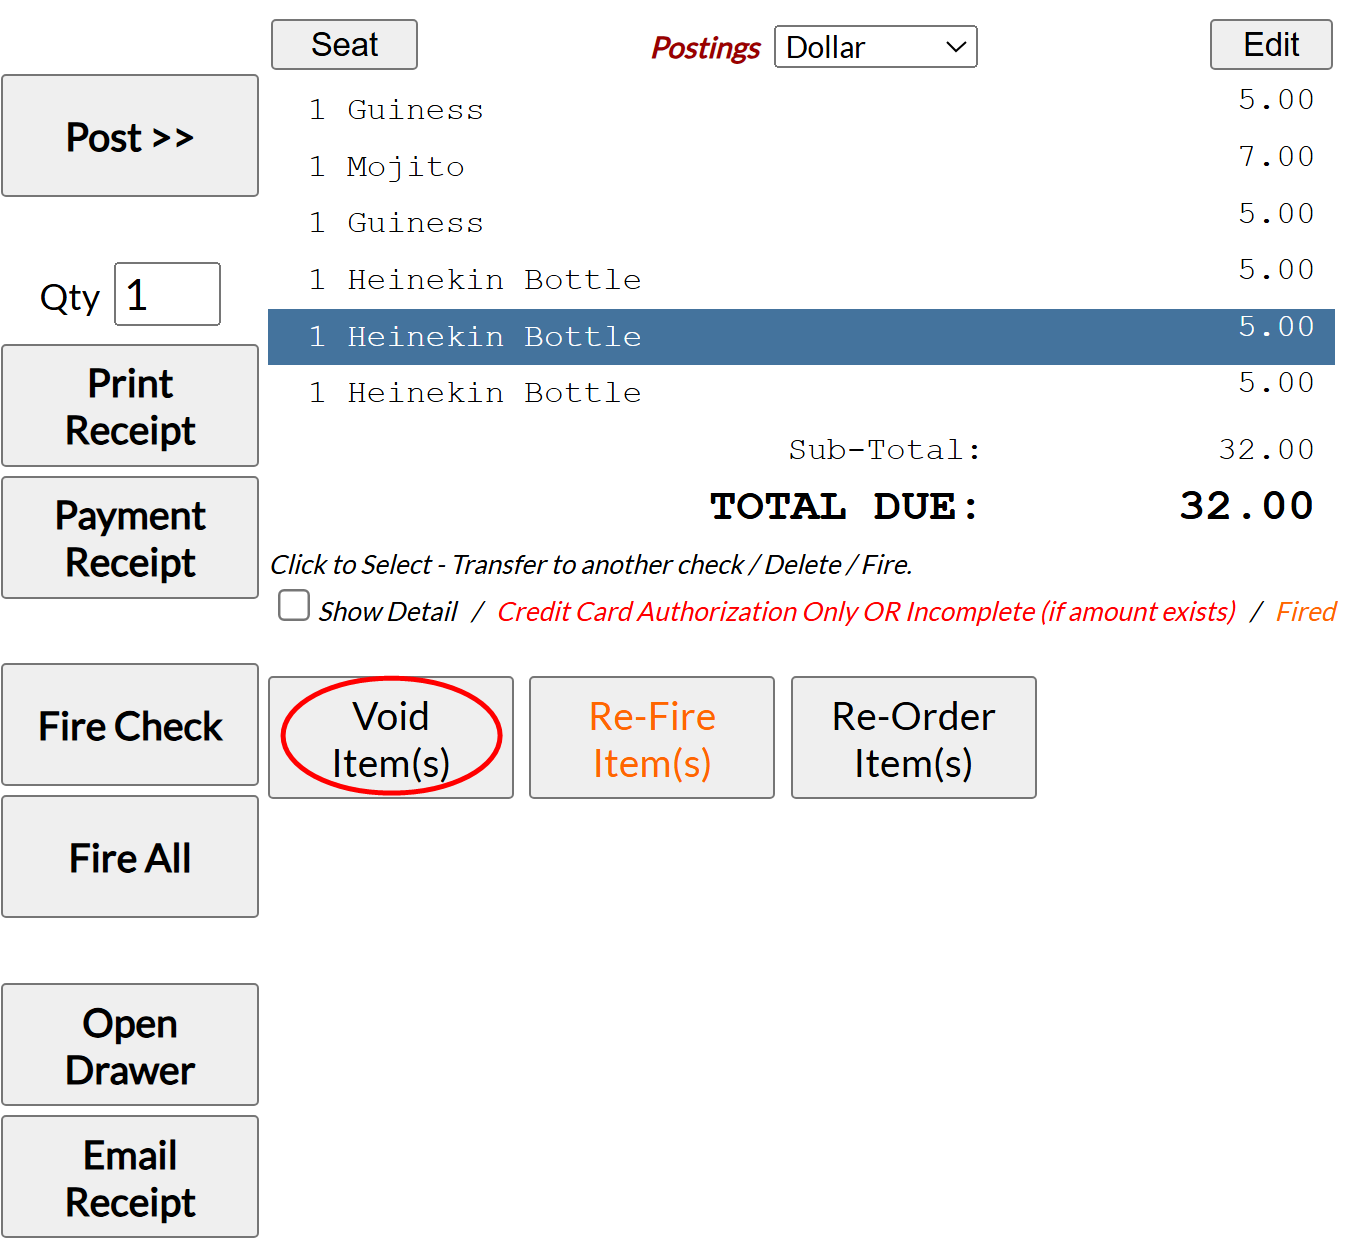
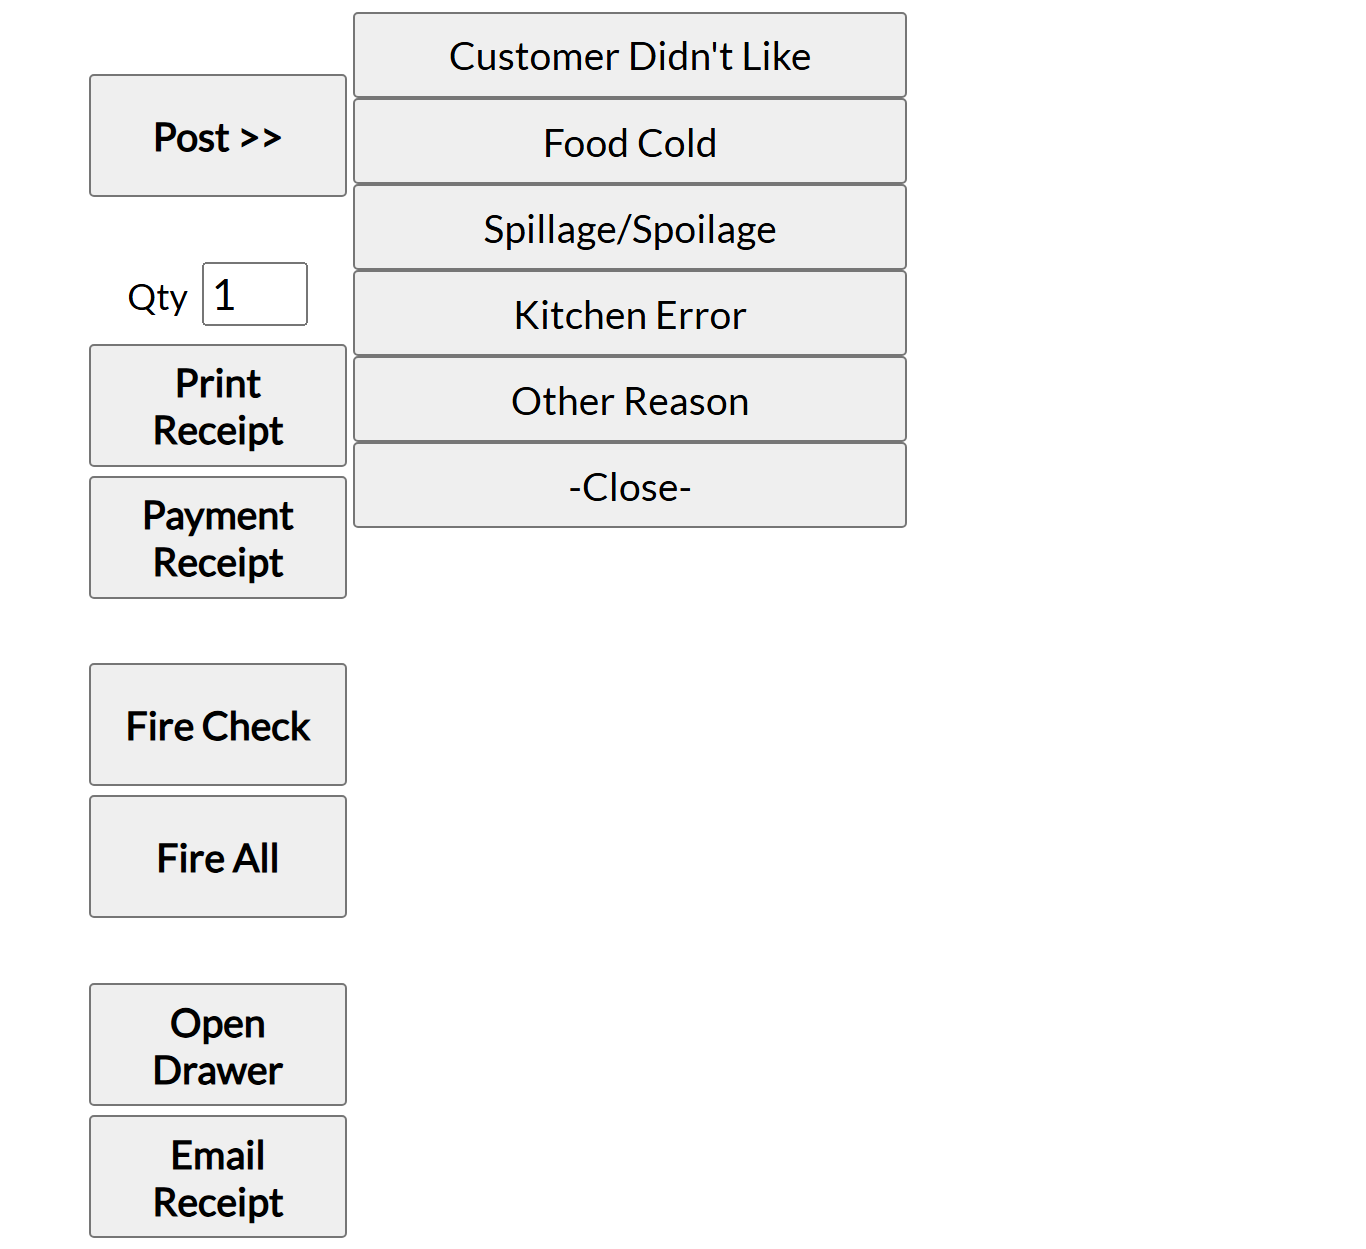
Click the Void item(s) button below the posted list. This opens a list of possible reasons for the Void. Select the appropriate one (or the -Close- option) to return to the Postings List view.
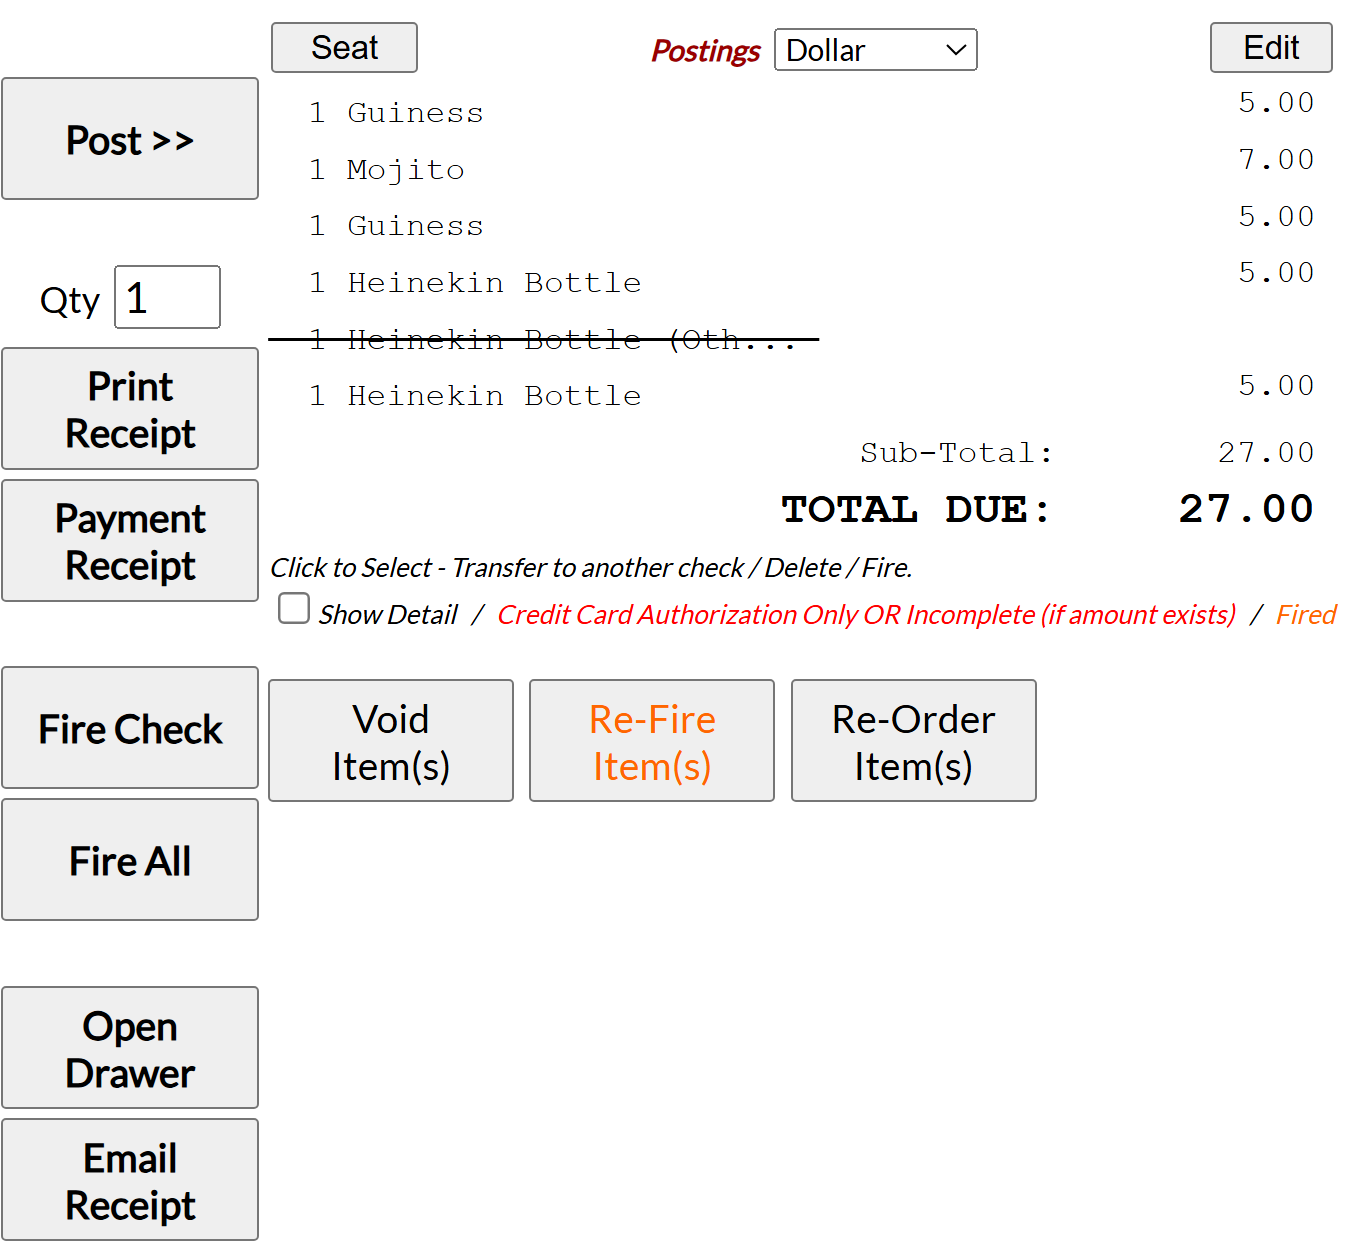
This will remove the item from the posted list and is shown by a strike-through of the item on the list.
IMPORTANT: To CHANGE the preparation or modifier for an item, you must void the item and re-add it with the correct options.
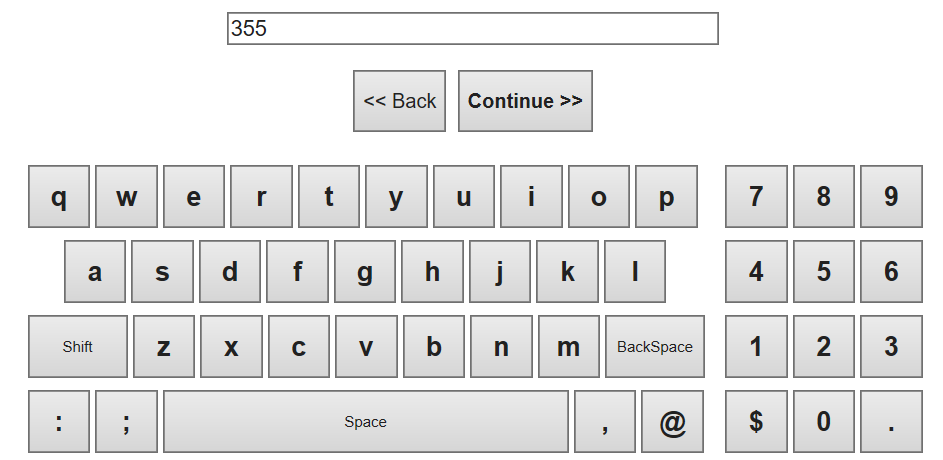
Note: To void an item AFTER it has been fired may require a pass code. If so, after clicking the Void Item(s) button a new screen called the pass code screen will open. In the pass code screen, enter the pass code, and click continue to return to the Restaurant Check screen.
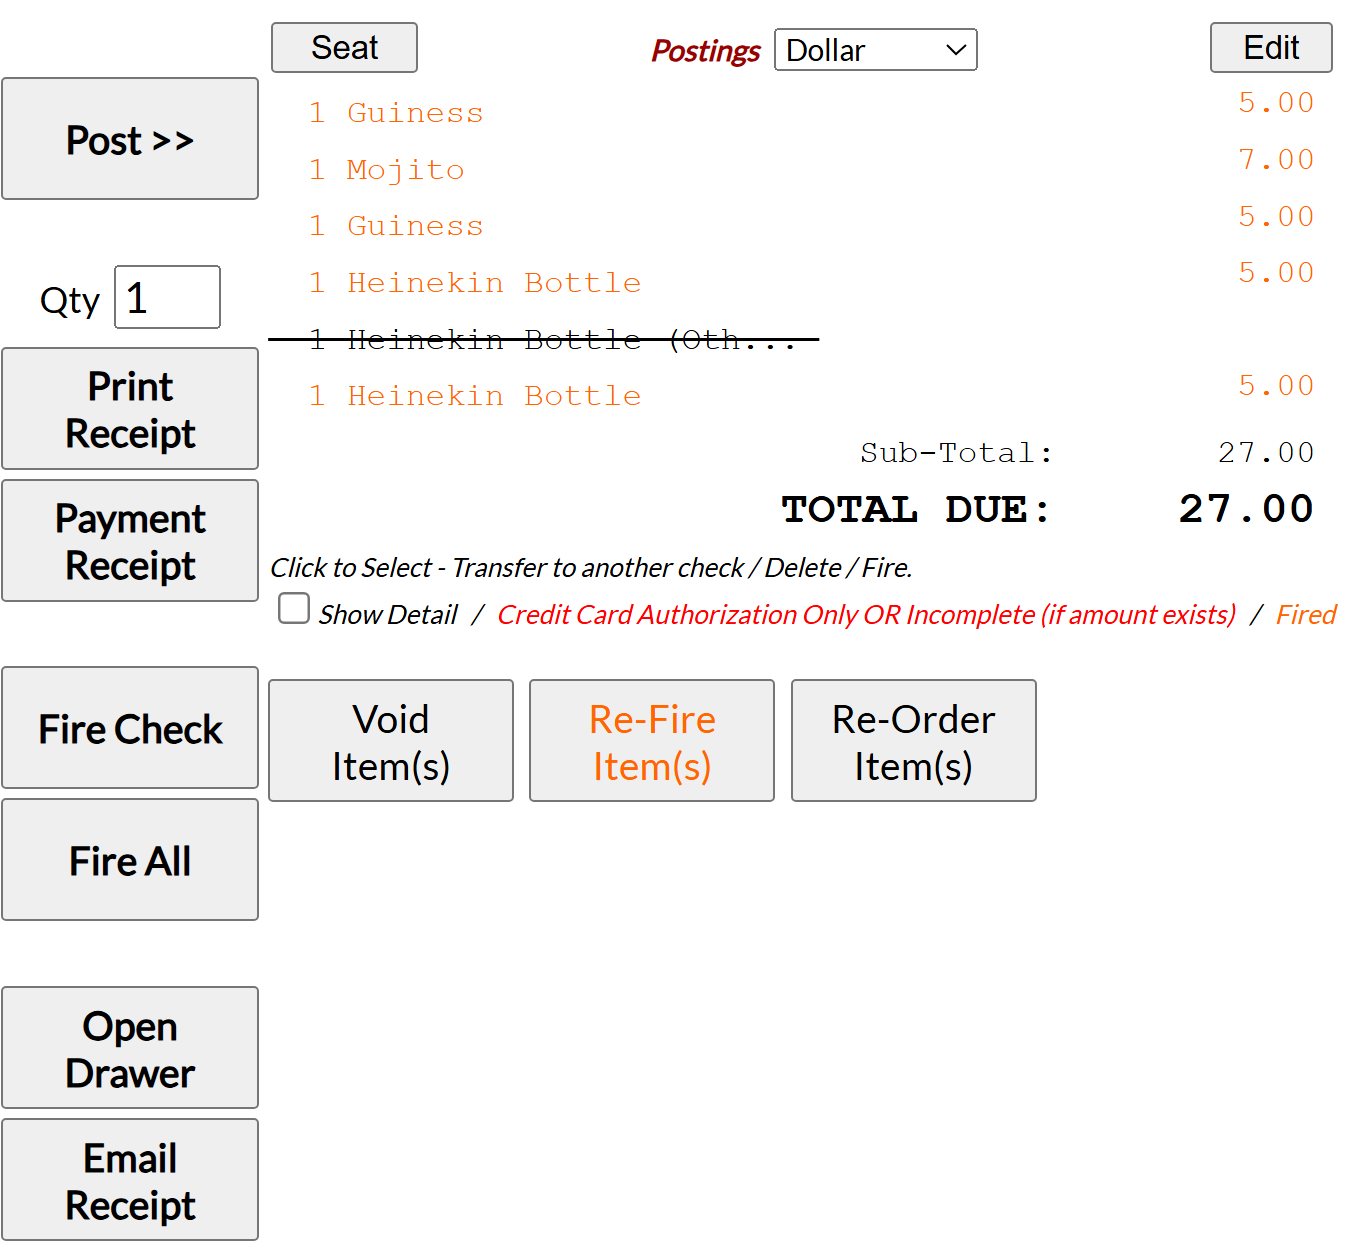
Use the Fire Check button to fire any selected posted item(s) to the kitchen for preparation, or the Fire All button to send all items at once.

Once items have been fired they will appear on the posting list in orange.
If any item needs to be remade, it needs to be re-fired.
In the Postings list, select the item to be re-fired then click the Re-Fire item(s) button below the posted list.
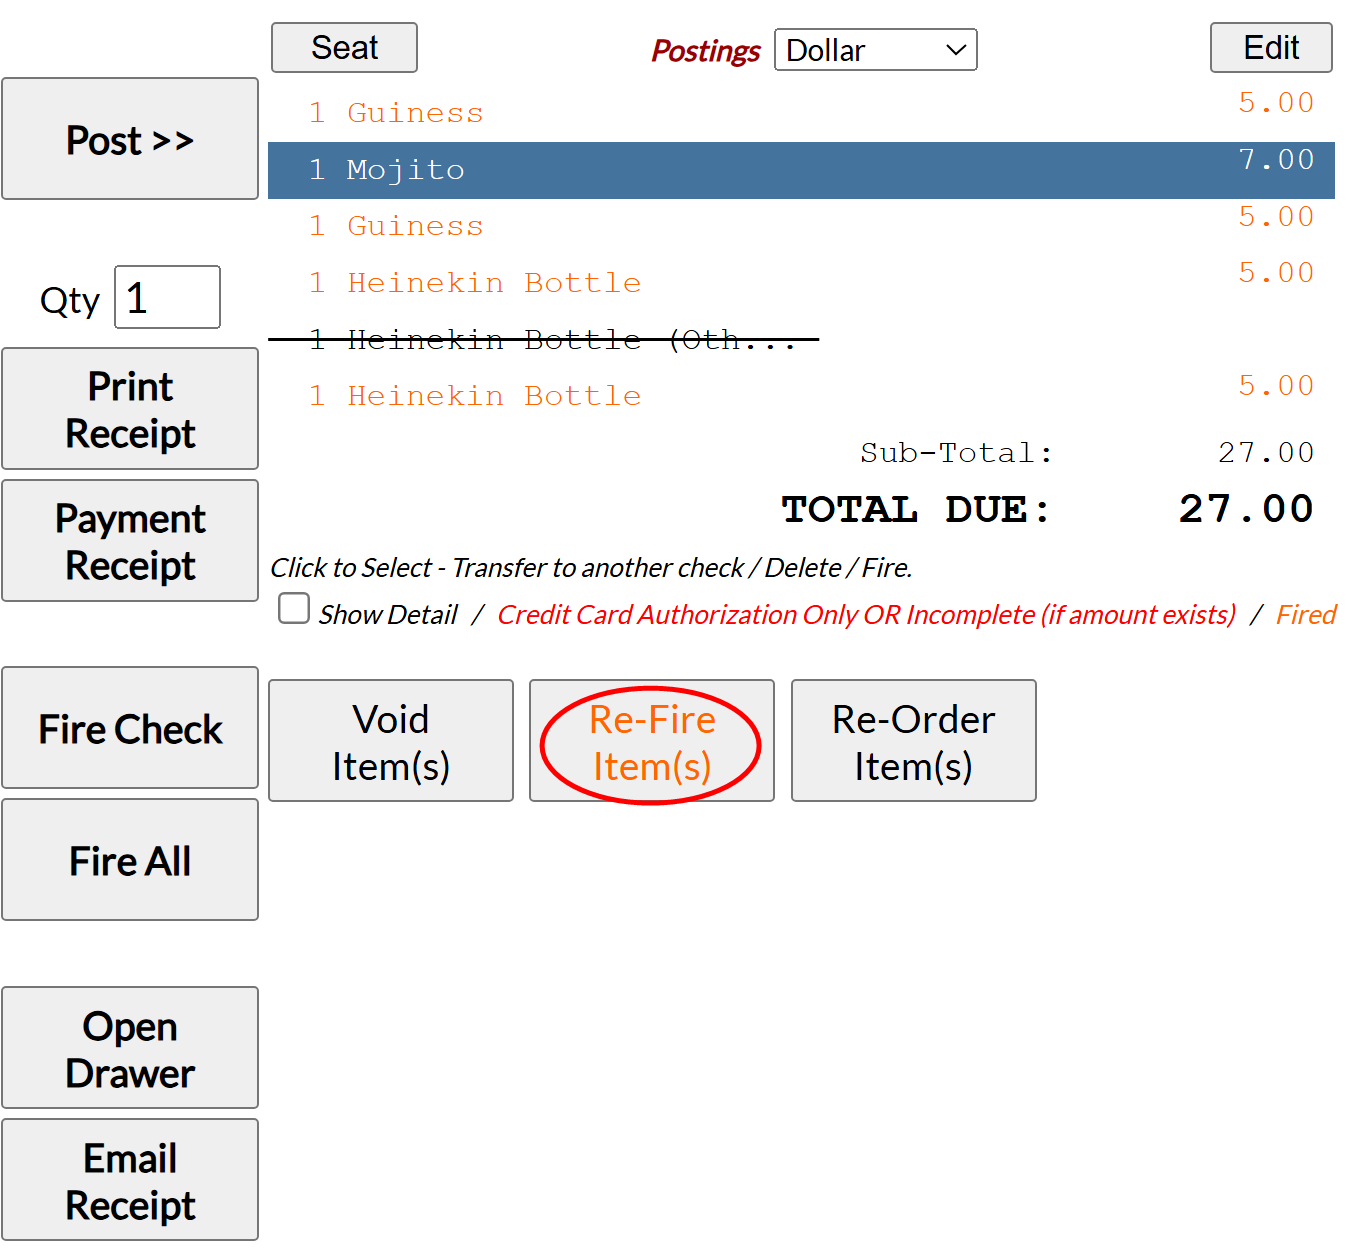
The item in the posted list will now be shown again in black; select the item once more and click the Fire button to re-send the item to the kitchen for preparation.

Note: This may require a pass code. If so, after clicking the Re-Fire Item(s) button a new screen called the pass code screen will open. In the pass code screen, enter the pass code, and click continue to return to the Restaurant Check screen.
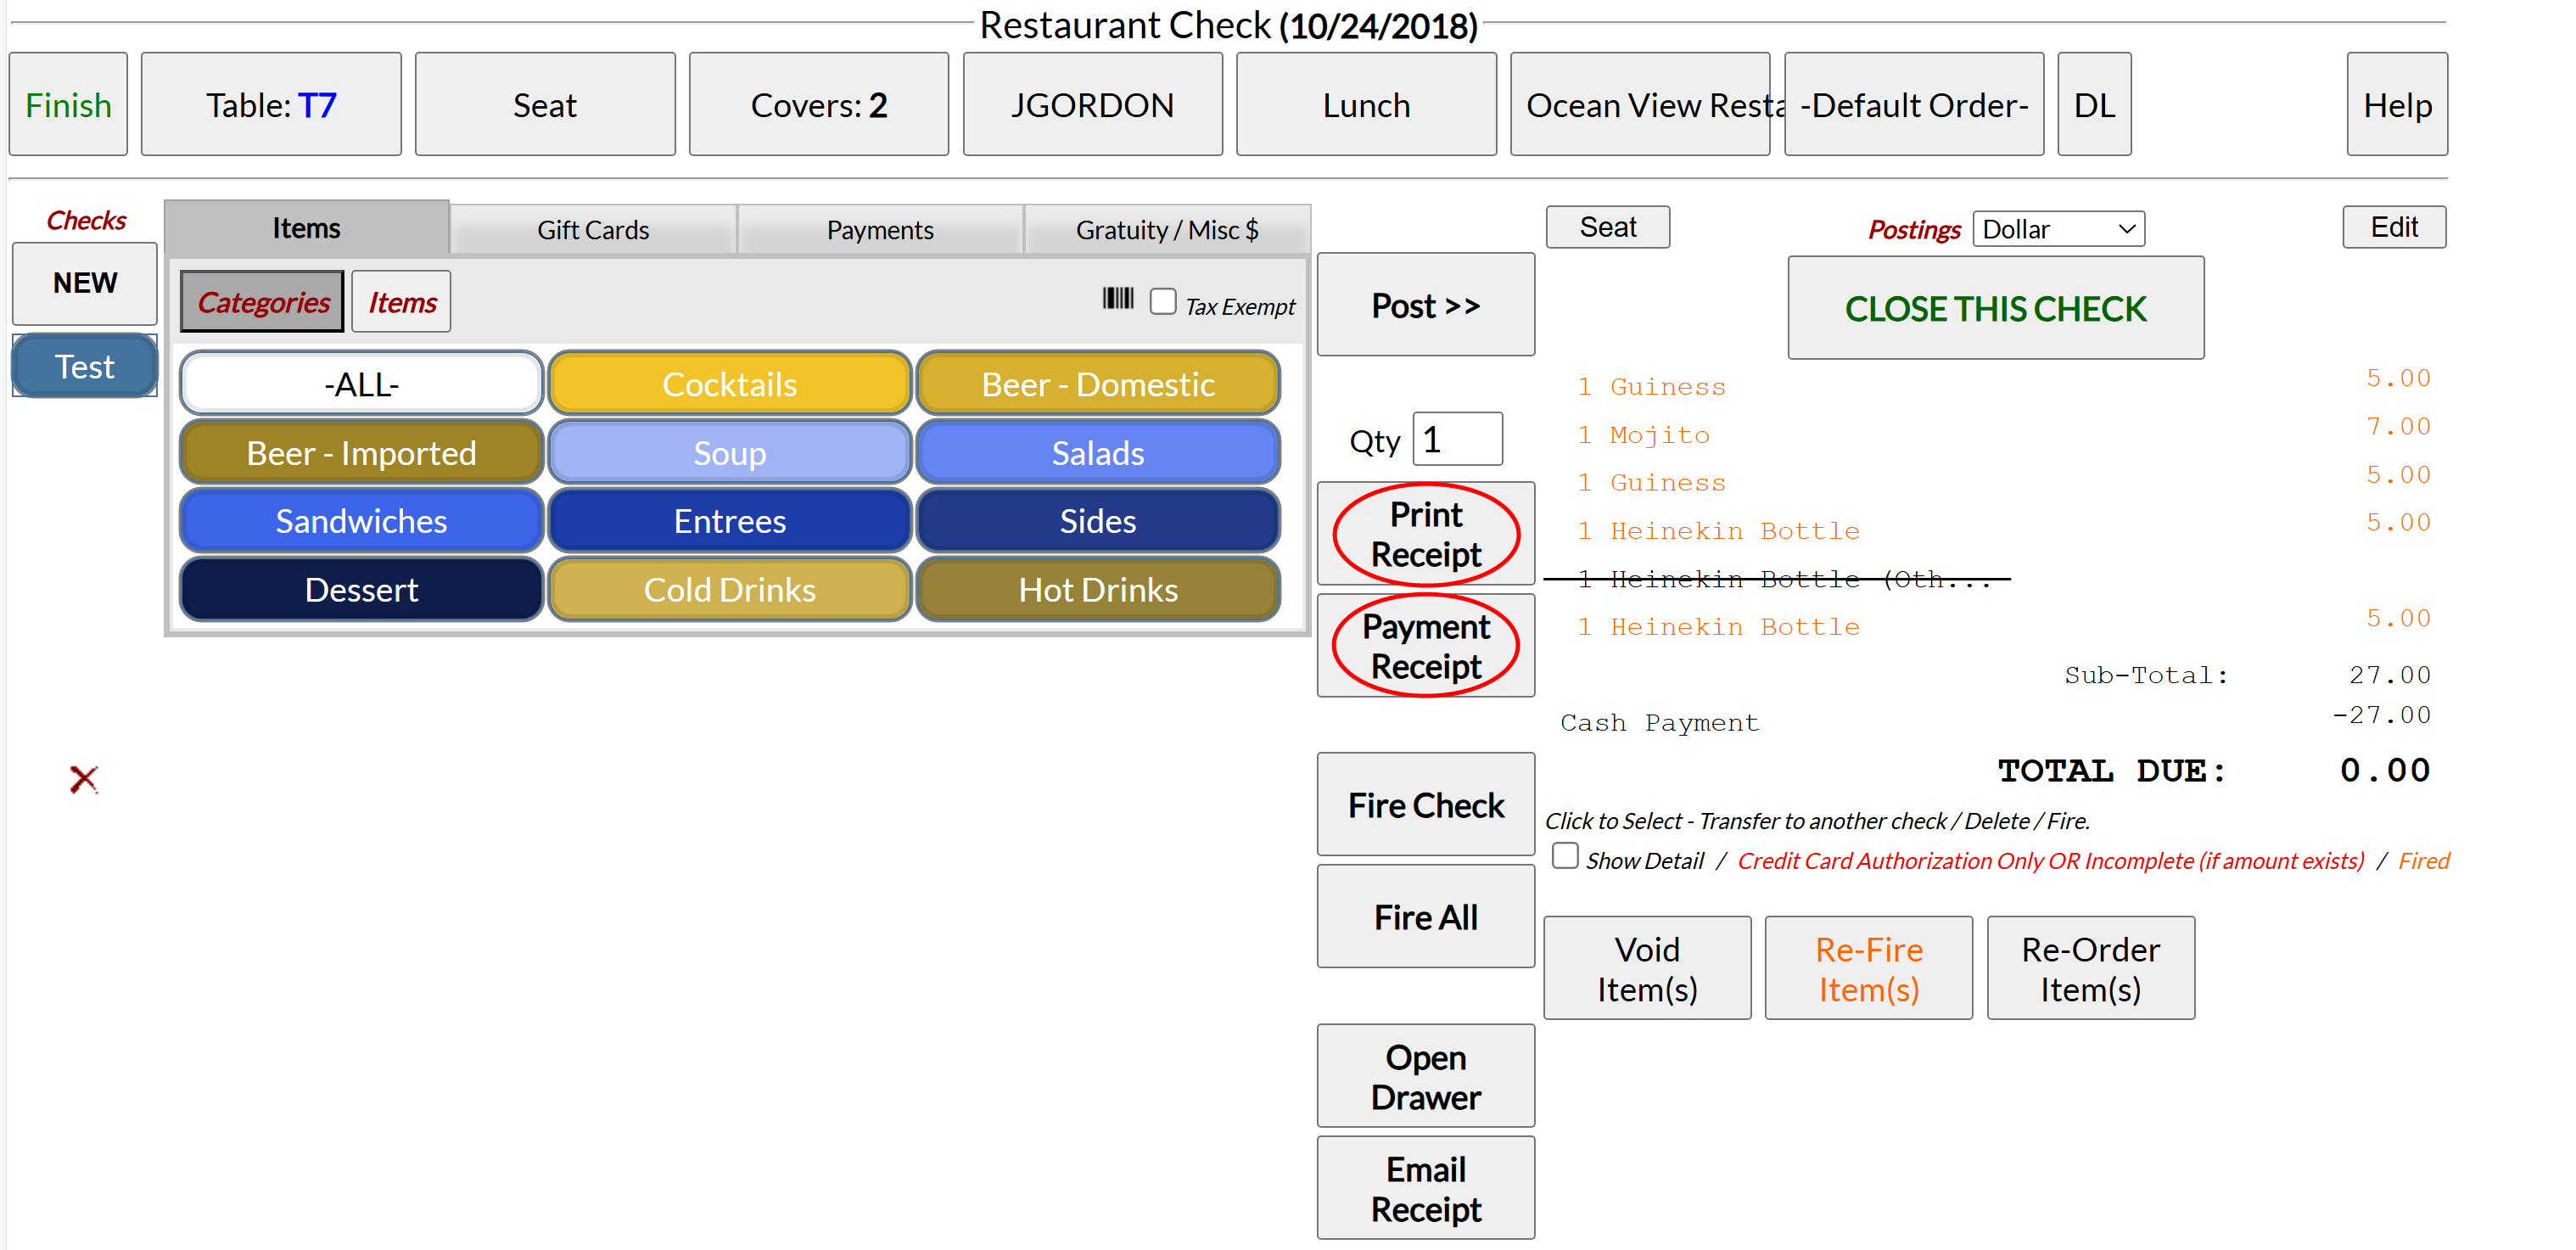
The Restaurant Check screen is also where payments are posted to be applied to open checks, and checks with zero balances are closed and receipts are printed from. The Postings list on the right hand side of the screen provides the running total of the currently open check. The Payments tab (middle section below banner) has several fields and allows you to apply customer payments to the open check. When ready to make a payment to this open check, select the Payments tab.
Clicking on the Payments tab will open the payment type option fields. Various options will be available such as cash, room charge or credit card. The currently selected payment type will be shown in blue, the rest in white.

Note: Any payment methods that have an * next to them require a Quick ID. Not all properties use them.
When chosen, all options will have a similar set of fields to complete, including splitting buttons, amount or tendered field, a refund button and fields for the Quick ID and Pass code. They do however differ slightly depending on the details (for example, cash payments will not have any fields to enter credit card details, and cash payment has an additional "change due" field). (Please see How to Make a Payment for further details on this subject, or How to Split a Check for help on dividing the payment owed between multiple options. It is also possible to reverse a payment, if there has been a problem with the payment, see How to Reverse a Payment for details).
If one is shown, the gratuity field on the Payment tab is generally only used with credit card payments. In all other cases the Gratuity/Misc $ tab should be used. See also Applying Discounts or Gratuities to a POS Open Check.
Note: Apply any calculated gratuities or discounts to the check before taking payment, and if you need to split the check (again, see below for details), it is recommended that you apply credit card or room charge payments before applying cash payments when a check is split.
Whichever payment type you are using, once the fields are completed, be sure to click the Post button to post the check and take the payment.
This applies the payment to the check. The payment will NOT be applied until you have posted it.
All posted payments will be shown on the postings statement (including how the payment was made), and when you have finished taking payment, should bring your check to a total due 0.00 balance.

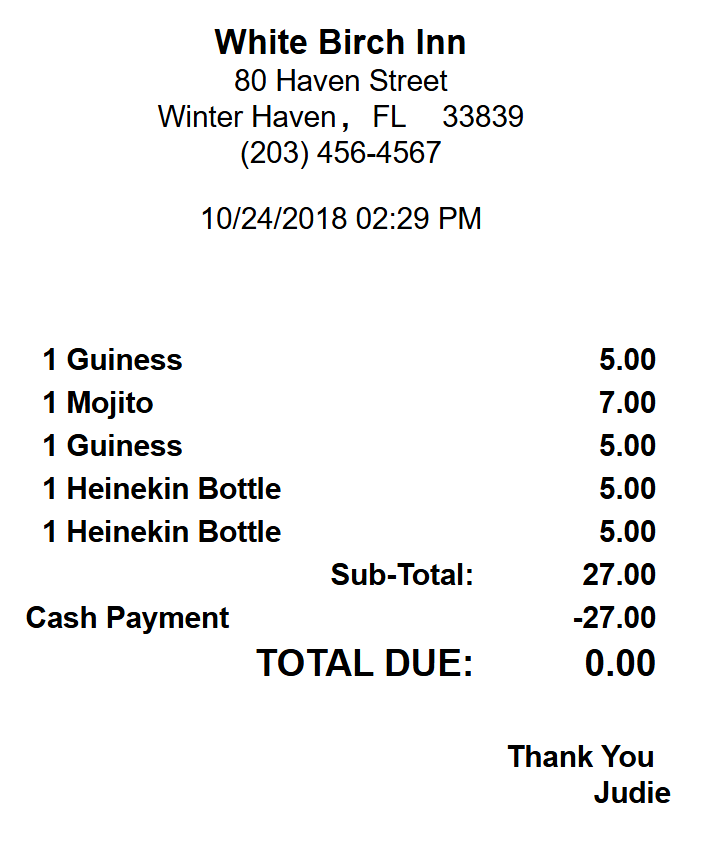
Once the check is paid, you can click the Print Receipt button to provide a copy to the customer or, if the check is paid using a credit card, click Payment Receipt.
Note: If there is an issue with remote sending of the receipt to the printer, you will see the "Check NOT printed" error button and need to correct the problem before it may be printed. See Check(s) NOT Printed (POS) for more details.
You may also email the receipt, if you have an email address to send it to (have a contact record for the guest). This is generally only the case if you are using the screen with activities, such as a spa.

Clicking on the Email Receipt button will open a screen for you to input the email address. 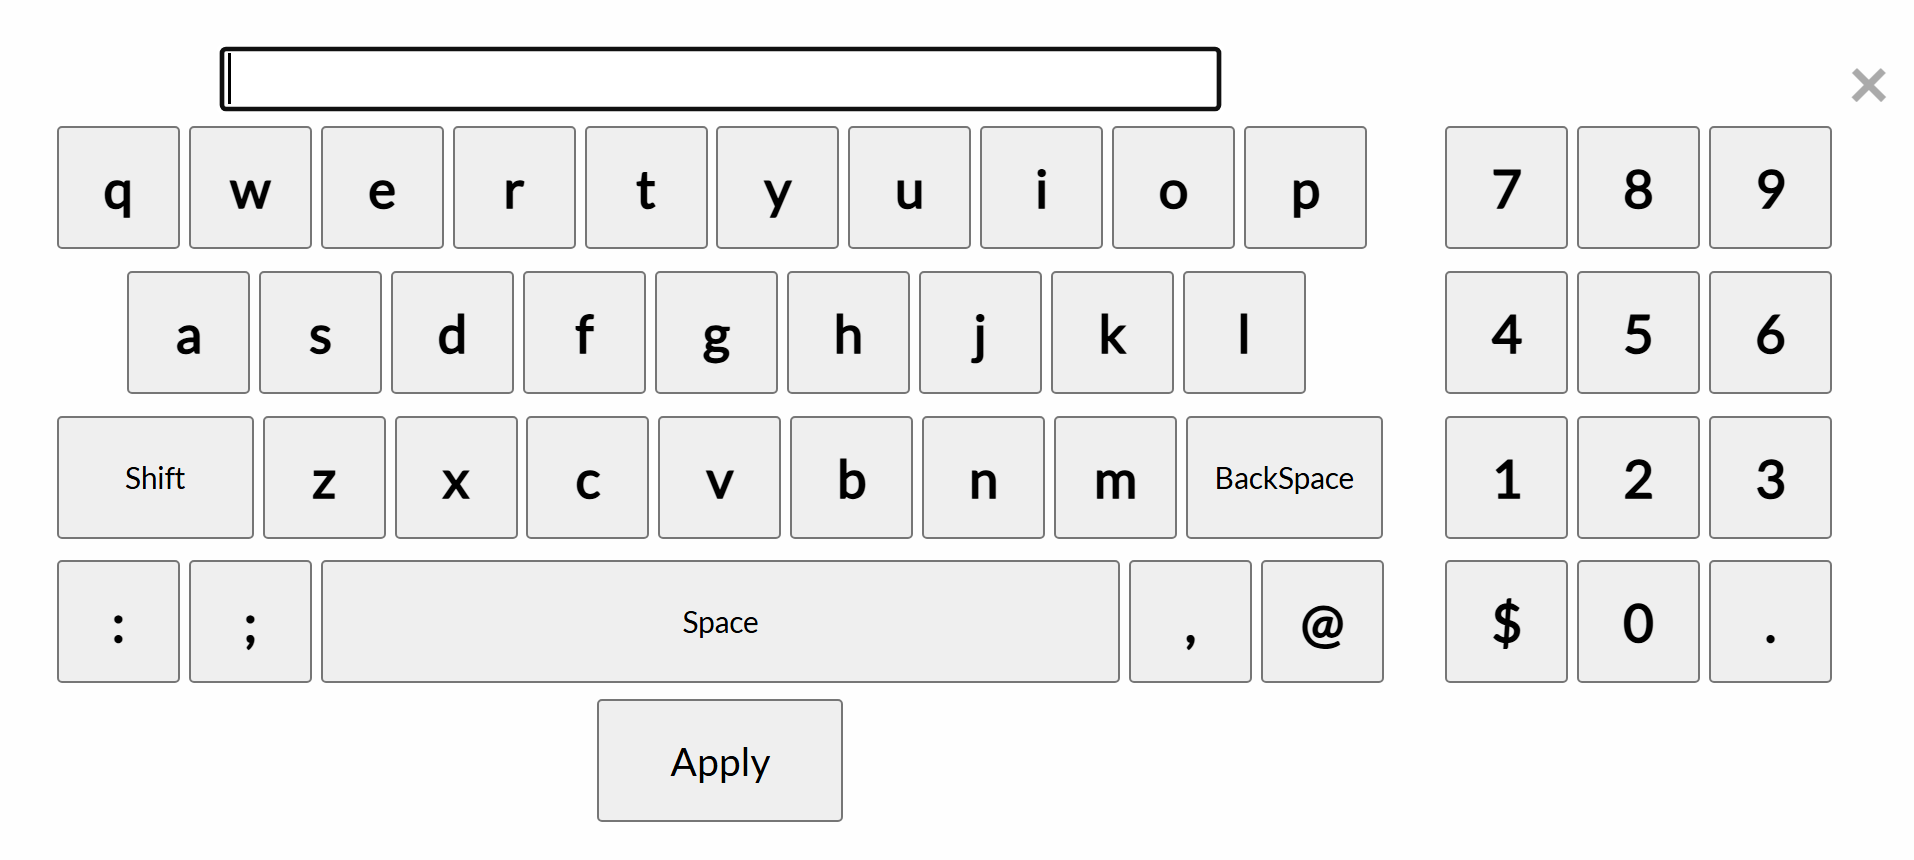
Once the address is entered and the Apply button clicked, a copy of the receipt will be sent to the specified email address.
When the balance on the check is zero, click Close This Check to close the check.

When the check is closed, it will be saved to Skyware and the restaurant check screen will be returned to the new check screen, ready for you to open the next check. (The Check History command (in the main Point of Sale (POS) menu) allows you to view and search through all closed checks in the system).
As mentioned in discussion of the Payments tab, any calculated gratuities or discounts should be applied to the check before taking payment. For any payment method OTHER than credit card payment, the Gratuity/Misc $ tab should be used. (Any non-credit card payment where the gratuity needs to be recorded, the gratuity should be posted from the Gratuity/Misc $ tab). See also Applying Discounts or Gratuities to a POS Open Check. This tab allows you to apply a gratuity (tip) and/or discounts to the check, in either currency amount or as a percentage of the check.
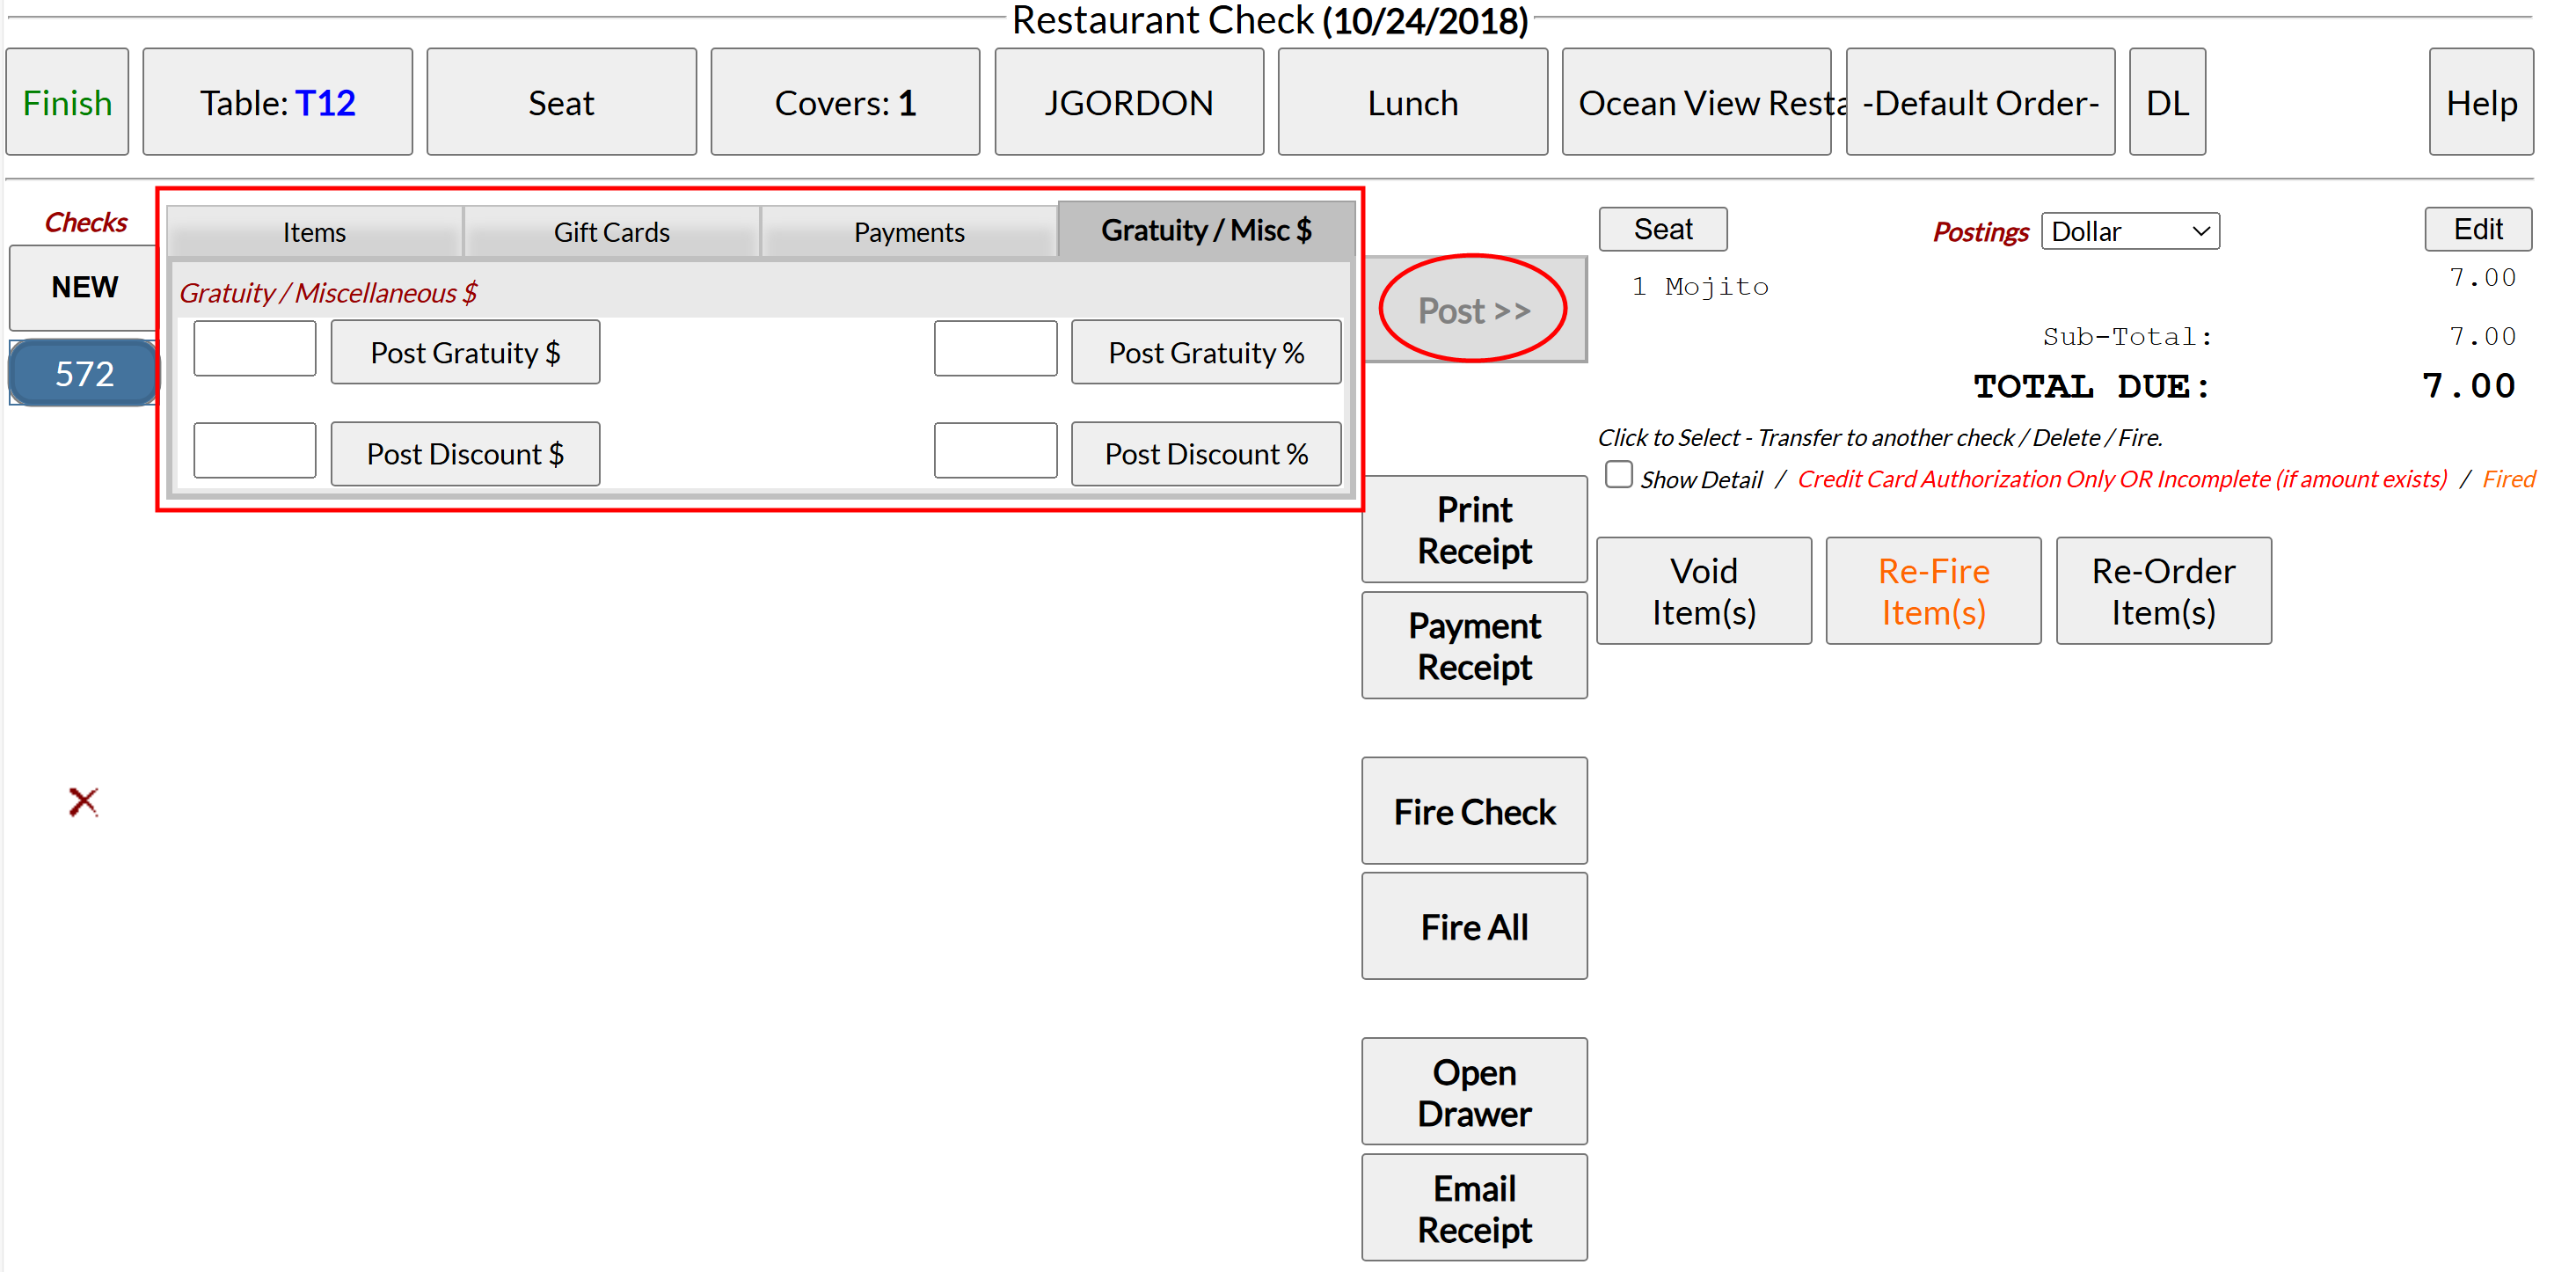
Each of the (4) boxes on the tab has its own "Post" button associated with it. This allows you to enter the gratuity amount or percentage or the discount amount or percentage and post each separately to the check. The buttons in this section (the Post Gratuity / Post Discount buttons) RATHER than the Post button on the main screen should be used for posting gratuities or discounts. These can be applied either as straight currency amounts (left) or as a percentage of the check (right) for both discounts and gratuities.
Note: When the Gratuity/Misc $ tab is open, the Post >> button on the main screen will be grayed out and unavailable.
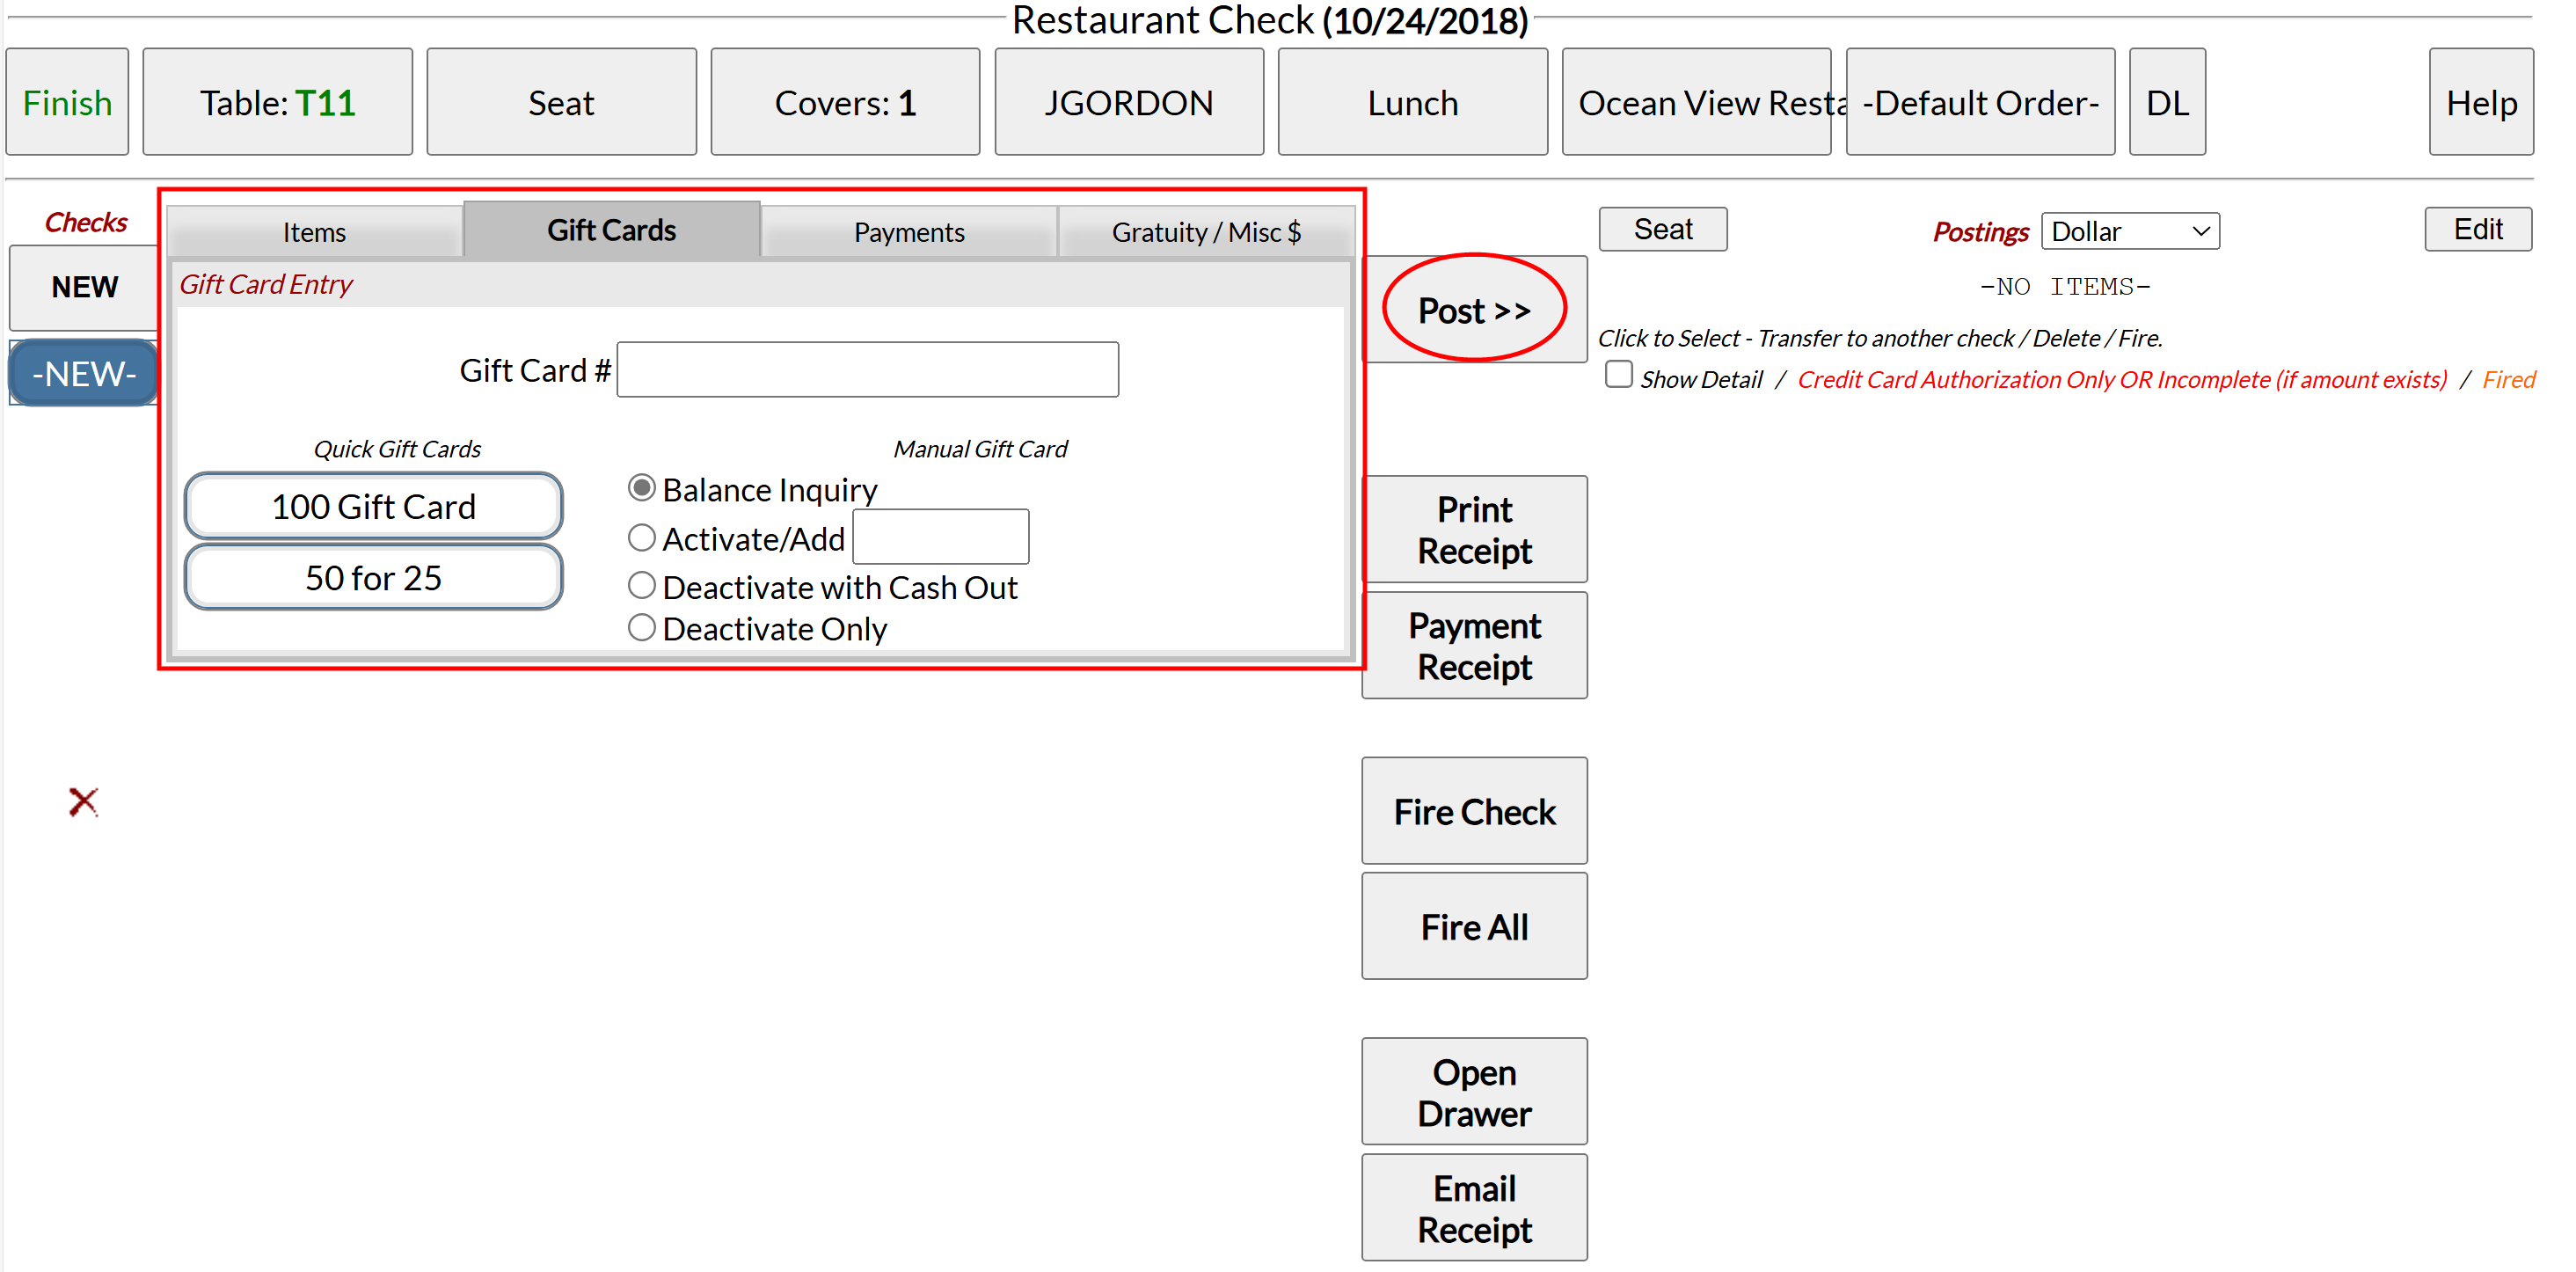
Note: The Gift Card tab shown on the Restaurant Check screen and Quick Sale screen is NOT for USING a gift card, it is for use in ACTIVATING a gift card. It may also be used for balance inquiries or in deactivating a card, but if a guest wishes to use a gift card in PAYMENT then the Gift Card option on the PAYMENTS TAB should be selected.
Gift cards are physical cards appearing much like a credit card. For gift card use at your Property, you must have a supply of blank gift cards (purchased from Factor 4) ready to be activated when purchased by your guests. Gift card use MUST be enabled by Skyware for your Property before any can be issued or used. (Please see our Help topic "How to Enable Gift Card Use" for further details, and call us at Skyware to enable your gift card use). Gift card use is not authorized automatically by Skyware; however their use is easy to initiate, and once enabled simply requires the generation of a gift card payment posting type. After this, gift cards may be activated via the Gift Cards tab. Any templates generated using the Quick Gift Card screen will be available for selection on this tab, as well as the option to enter gift card amounts manually being available.
When opened, the gift card tab will show all the fields necessary for you to activate a gift card.
FIRST, you must generate the Card token. You MUST scan the gift card first to get the token before anything further can happen. This is the physical card that will be given to the purchaser and subsequently used as the gift card. Only once a token has been entered into the Card Token field will you be able to proceed with any thing further, be it activation, adding value, balance inquiry or deactivation.
One you have generated the card token, you may proceed to activate the card:
To activate a new card, you will need to select the radial button "Activate/Add" from the available options in the right side buttons under Manual Gift Card and complete the field with the desired amount. (Subsequently other actions are available for use with gift cards but initially the card must be activated for use).
Once the field has been completed with the balance to appear on the card, click the "Post" button (to the right of the tab). This will then post the required payment for issuing the gift card (any time money is placed on a gift card, it must be purchased with some other form of payment). Take the payment as usual, and print out the receipt for the purchaser.
Note: If you have Gift Card templates (created using the Quick Gift Card screen) the templates will appear as buttons available for selection on the left side of the tab under Quick Gift Cards.
Using a gift card template will automatically fill out the card information (how much it will be loaded with, and how much the cost will be when posted). You will however still need to click the post button, take the payment and print the receipt. IF you wish to load a gift card with an amount OTHER than the purchase price (such as spend $25, get $50 value) you MUST set it up as a template before card activation.
An activated gift card now acts as a credit card would (to the total of the amount placed on it), and may now be used for payment in the same way; when used, the payment type on the receipt will list gift card.
The Gift Card tab is also used for adding value to an existing card, if a balance inquiry is requested or any deactivation/reactivation of gift cards. These actions are all choices within the radial button options on the right side of the Gift Card tab. This is because for any of these actions you will need to give a receipt to the gift card holder. For example with a balance inquiry, the receipt would be printed with the total remaining balance on the gift card. the receipt is a proof of what action has taken place, for both you and the recipient.
Date Updated May 27, 2026